Erste Schritte mit PLCPrime
PLCPrime ist eine SPS-Simulation, die direkt im Browser läuft. In etwa zehn Minuten lernen Sie hier die Oberfläche kennen, schalten eine Lampe, sehen sich ein Steuerungsprogramm an und lösen die erste Aufgabe aus dem Lernpfad – mit einem Programm, das Sie selbst bauen.
PLCPrime jetzt öffnenWie geht es weiter?
Das brauchen Sie: einen Computer (Laptop oder Desktop, für das Handy ist die Oberfläche zu klein) mit aktuellem Browser und einer Maus. Keine Installation und kein Konto. Das Paket Basis ist dauerhaft kostenlos. Bitte beachten Sie: Im kostenlosen Paket bleibt nichts gespeichert, nach dem Neuladen beginnt PLCPrime wieder mit der Startszene. Speichern gibt es ab Pro (Preise).
1. Die Oberfläche kennenlernen
Öffnen Sie plcprime.io. Sie sehen einen kleinen Raum mit einem Tisch, einer Lampe und einem Taster.
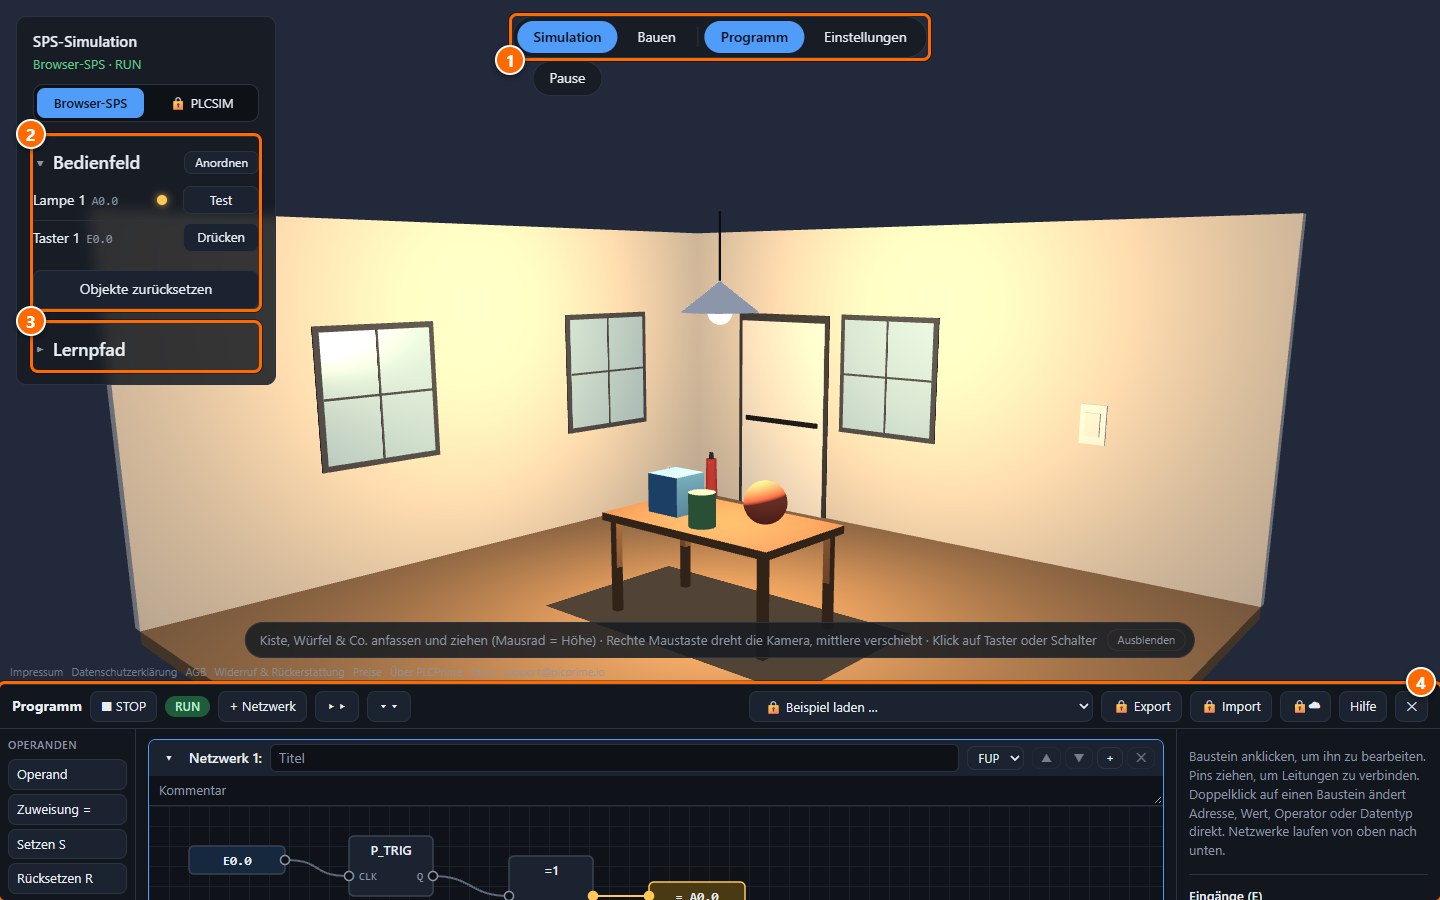
- Modusleiste: Simulation lässt die Anlage laufen, Bauen fügt Objekte hinzu und verschiebt sie, Programm blendet den Programm-Editor ein oder aus, unter Einstellungen ändern Sie Sprache, Helligkeit und Grafikqualität.
- Bedienfeld: Hier stehen alle Taster, Schalter und Lampen der Szene. „Objekte zurücksetzen“ stellt alles wieder an die Bauposition.
- Lernpfad: Aufgaben mit fertigen Szenen, 16 Level. Die ersten fünf sind frei, ab Level 6 brauchen Sie Pro.
- Programm-Editor: Beim ersten Besuch schaut er unten als schmaler Streifen heraus. Ziehen Sie ihn am oberen Rand nach oben, dann haben Sie mehr Platz (Doppelklick auf den Rand stellt die Höhe zurück).
Die 3D-Szene steuern Sie mit der Maus: Mit der rechten Maustaste drehen Sie die Kamera, mit der mittleren verschieben Sie die Ansicht. Kisten, Würfel und andere Teile fassen Sie an und ziehen sie (Mausrad = Höhe). Ein Klick auf einen Taster oder Schalter in der Szene bedient ihn.
2. Die Lampe schalten
Klicken Sie im Bedienfeld bei „Taster 1“ auf Drücken. Die Lampe geht aus, ein zweiter Druck schaltet sie wieder an. Beim ersten Besuch ist die Lampe schon an.
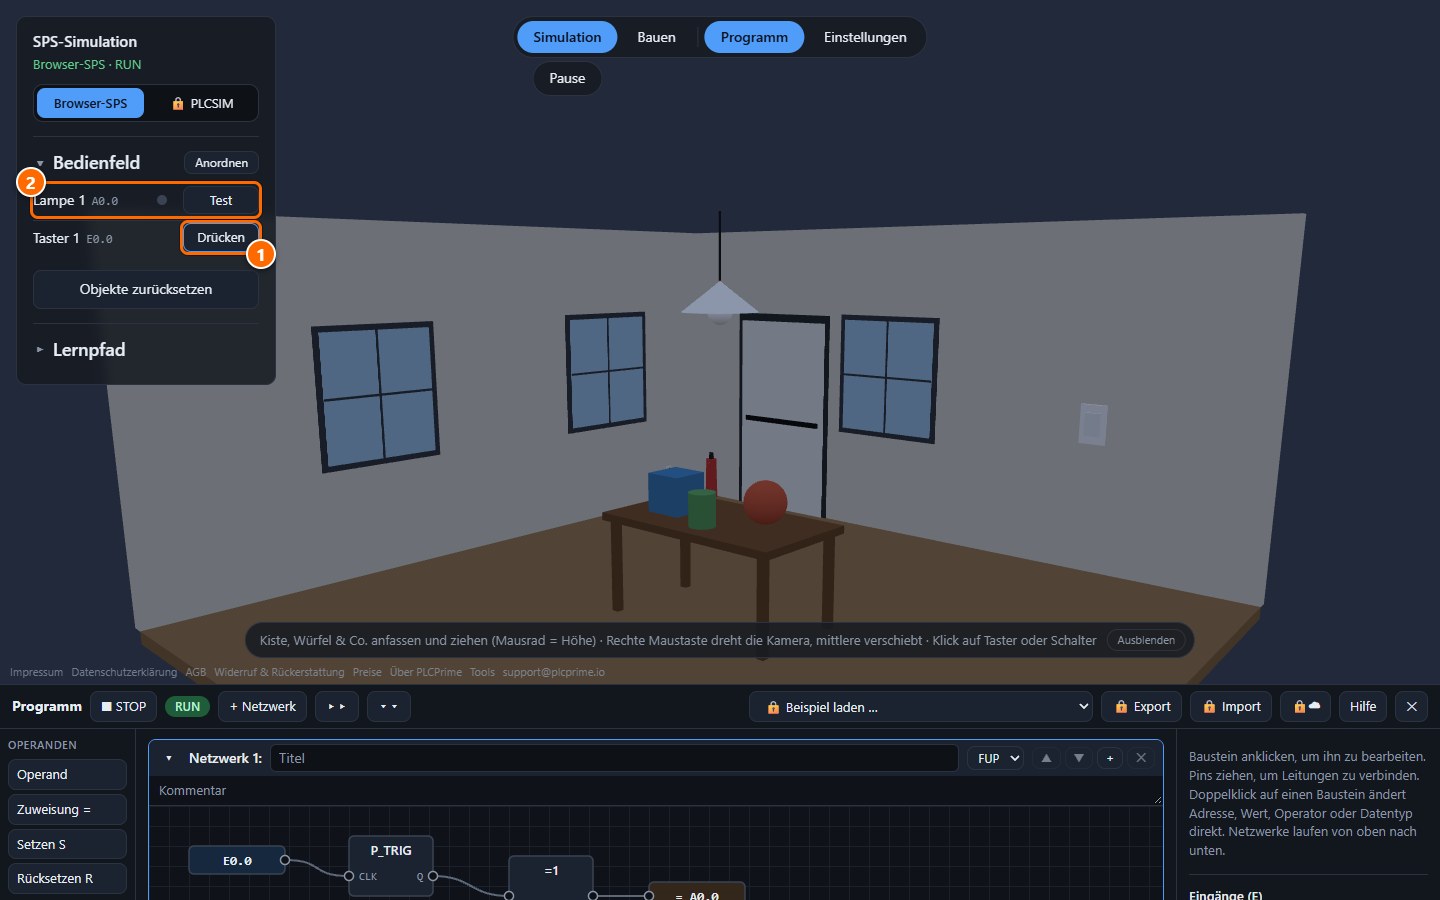
- Der Knopf Drücken bedient den Taster. Er ist ein Eingang der Steuerung mit der Adresse
E0.0. - Die Lampe ist ein Ausgang mit der Adresse
A0.0. Mit dem Knopf Test schalten Sie sie probeweise ein, solange Sie ihn halten.
Eingänge (E) lesen etwas aus der Anlage, Ausgänge (A) steuern etwas in der Anlage. Was zwischen Taster und Lampe passiert, entscheidet das Programm.
3. Das Programm ansehen
Ziehen Sie den Programm-Streifen nach oben. Sie sehen das Beispielprogramm, das den Taster mit der Lampe verbindet.
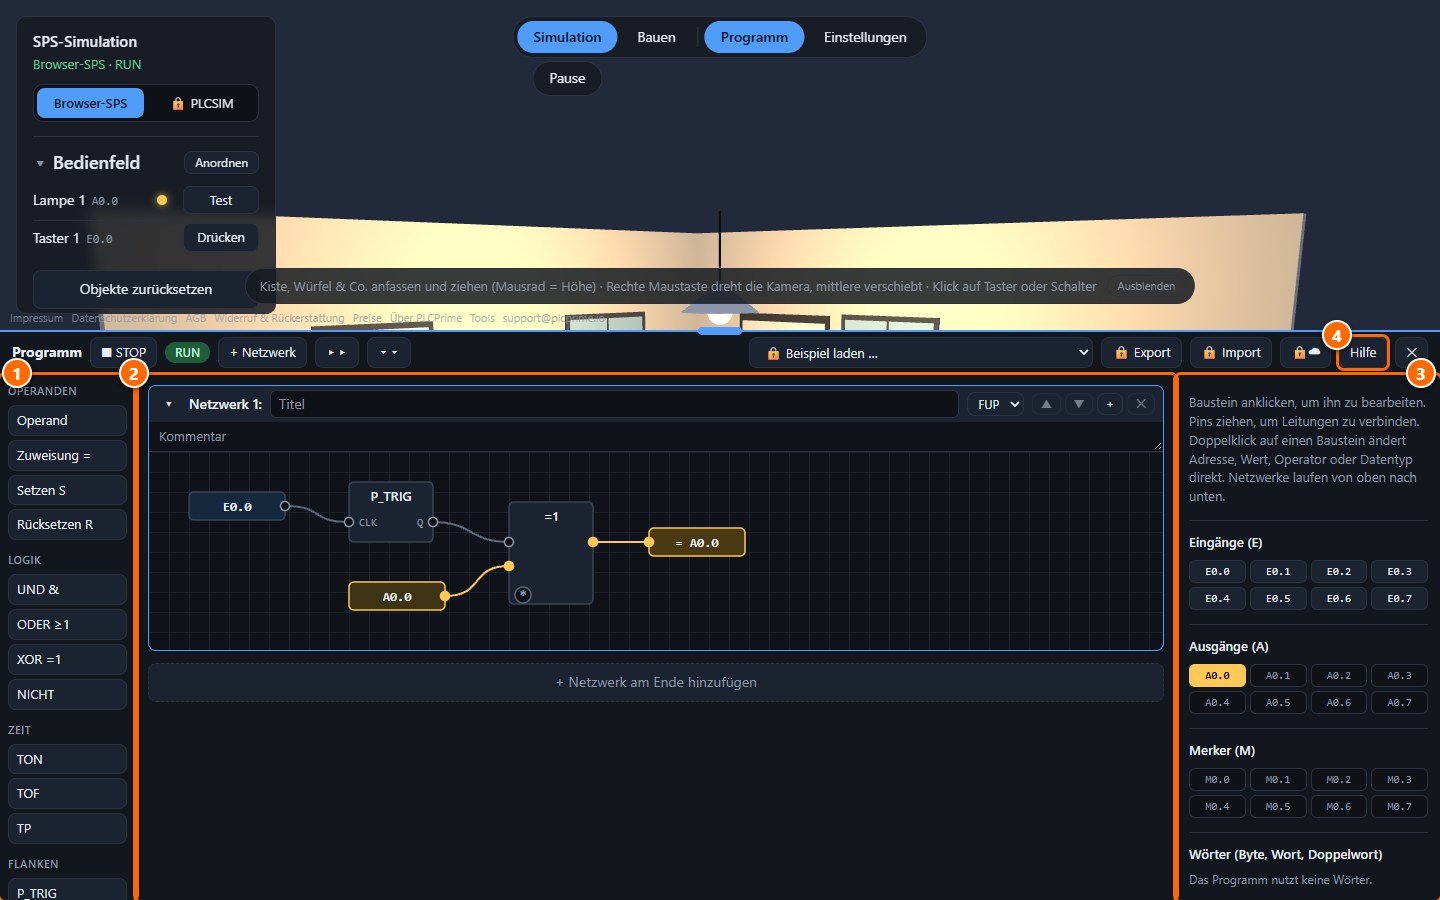
- Palette: die Bausteine. Operanden lesen Eingänge oder setzen Ausgänge, dazu kommen Logik (UND, ODER, NICHT), Zeiten, Flanken, Zähler und Speicher. Ein Klick fügt den Baustein ins aktive Netzwerk ein.
- Netzwerk: Hier steht das Programm als Funktionsplan (FUP). Netzwerke laufen von oben nach unten. Im Beispiel liest der Taster
E0.0den Eingang, P_TRIG erkennt das Drücken (steigende Flanke), und die LampeA0.0wird bei jedem Druck umgeschaltet. Jedes Netzwerk lässt sich alternativ in Kontaktplan (KOP) oder in SCL schreiben (Auswahl oben rechts im Netzwerk). - Eingänge, Ausgänge, Merker: Jede Adresse mit ihrem aktuellen Wert. Gelb bedeutet 1. Ein Klick schaltet die Adresse um.
- Hilfe: erklärt UND, ODER, Timer, Zähler, Vergleiche und die anderen Funktionen.
Dieses Beispielprogramm ist übrigens eine Lösung von Level 2 („Taster als Stromstoßschaltung“).
4. Die erste Aufgabe: Level 1
Klappen Sie links den Lernpfad auf. Level 1 ist „Schalter schaltet Lampe“.
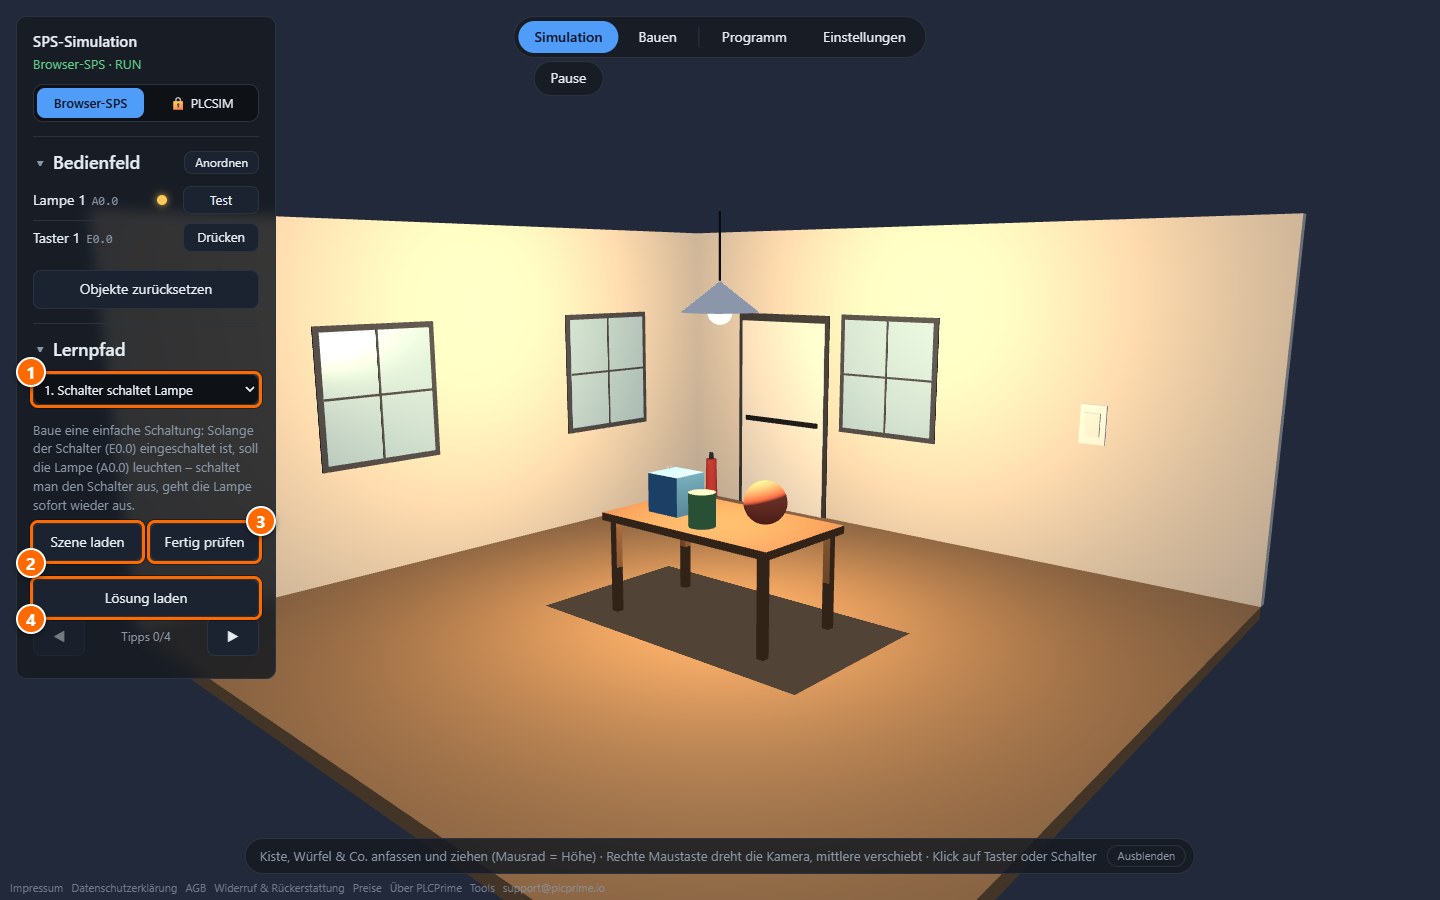
- Level-Auswahl: Darunter steht die Aufgabe.
- Szene laden: ersetzt die aktuelle Szene durch die Szene des Levels. Die Anwendung fragt vorher nach, antworten Sie mit „Ja“.
- Fertig prüfen: prüft, ob Ihr Programm die Aufgabe löst.
- Lösung laden: lädt das fertige Programm und ersetzt Ihres (Level 1 bis 5 für alle). Unter dem Knopf decken die Pfeile ◀ ▶ Tipps nach und nach auf – jeder verrät etwas mehr.
Klicken Sie auf Szene laden und bestätigen Sie. Statt Tisch und Taster sehen Sie jetzt einen Schalter und die Lampe.
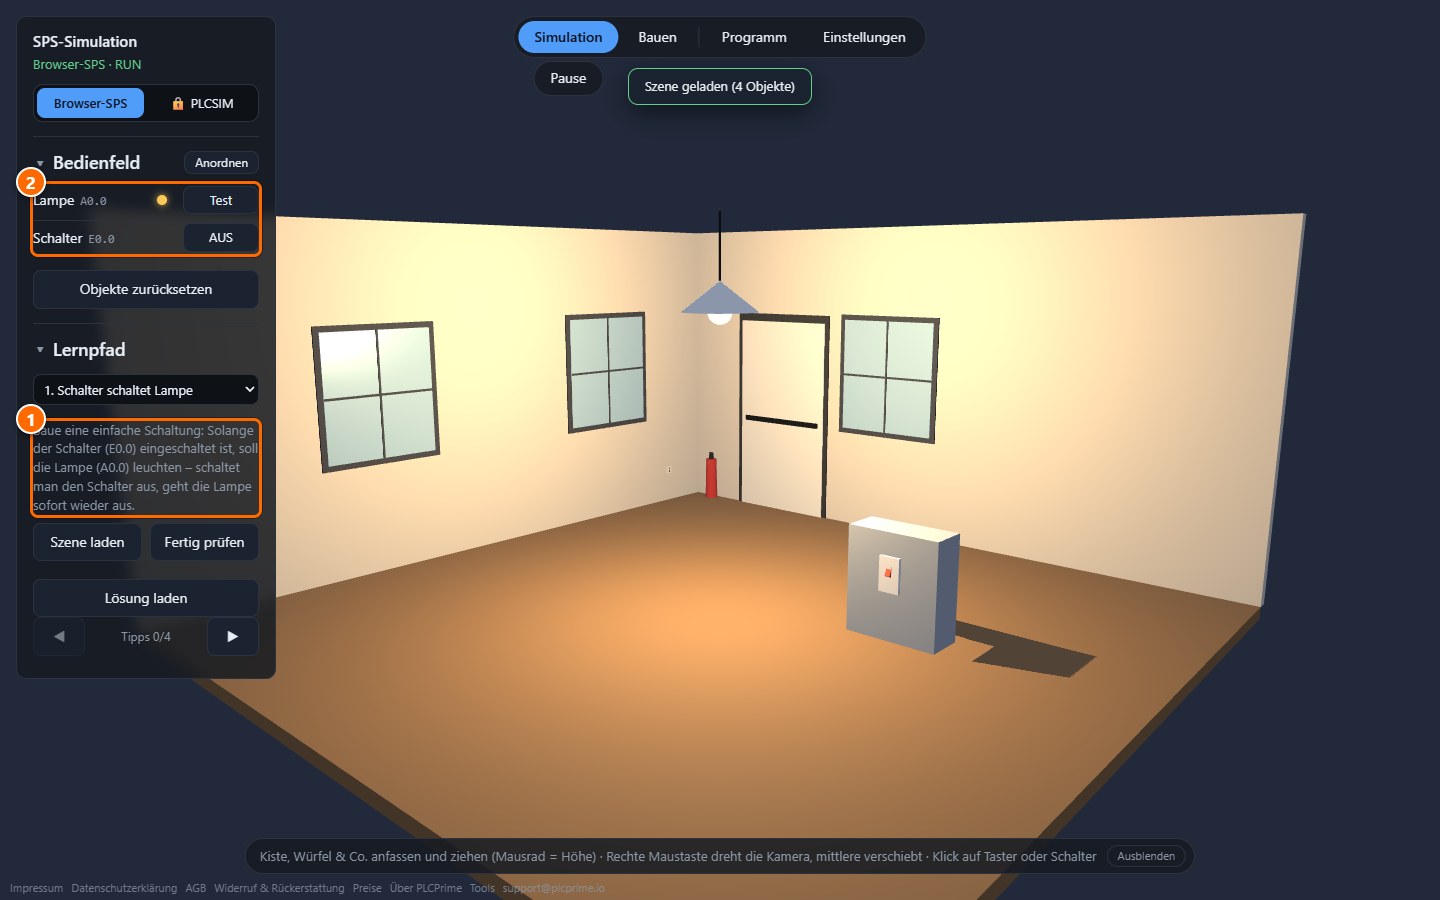
- Die Aufgabe: Solange der Schalter (
E0.0) an ist, soll die Lampe (A0.0) leuchten. Schaltet man den Schalter aus, geht die Lampe sofort aus. - Das Bedienfeld zeigt jetzt Lampe und Schalter.
5. Das Programm selbst bauen
Die Lösung braucht nur zwei Bausteine: einen Operanden, der den Schalter liest, und eine Zuweisung, die die Lampe schaltet.
- Öffnen Sie den Programm-Editor (Knopf Programm) und klicken Sie auf + Netzwerk. Unter dem Beispiel entsteht Netzwerk 2.
- Klicken Sie in der Palette auf Operand. Ein Baustein
E0.0erscheint, er liest den Schalter. - Klicken Sie auf Zuweisung =. Ein Baustein
= A0.0erscheint, er schaltet die Lampe. Die voreingestellten Adressen passen schon. Ändern können Sie sie, indem Sie den Baustein doppelklicken oder anklicken und rechts die Adresse eintragen. - Ziehen Sie die Zuweisung mit der Maus nach rechts, damit Platz bleibt.
- Ziehen Sie vom runden Anschluss rechts am Operanden zum Anschluss links an der Zuweisung. Damit ist die Leitung gelegt.
- Das Beispiel in Netzwerk 1 brauchen Sie nicht mehr. Klicken Sie in seiner Kopfzeile auf ✕ und bestätigen Sie mit „Ja“. Das ist aber nicht Pflicht: Netzwerke laufen von oben nach unten, ein späteres überschreibt einen Ausgang, den ein früheres beschrieben hat.
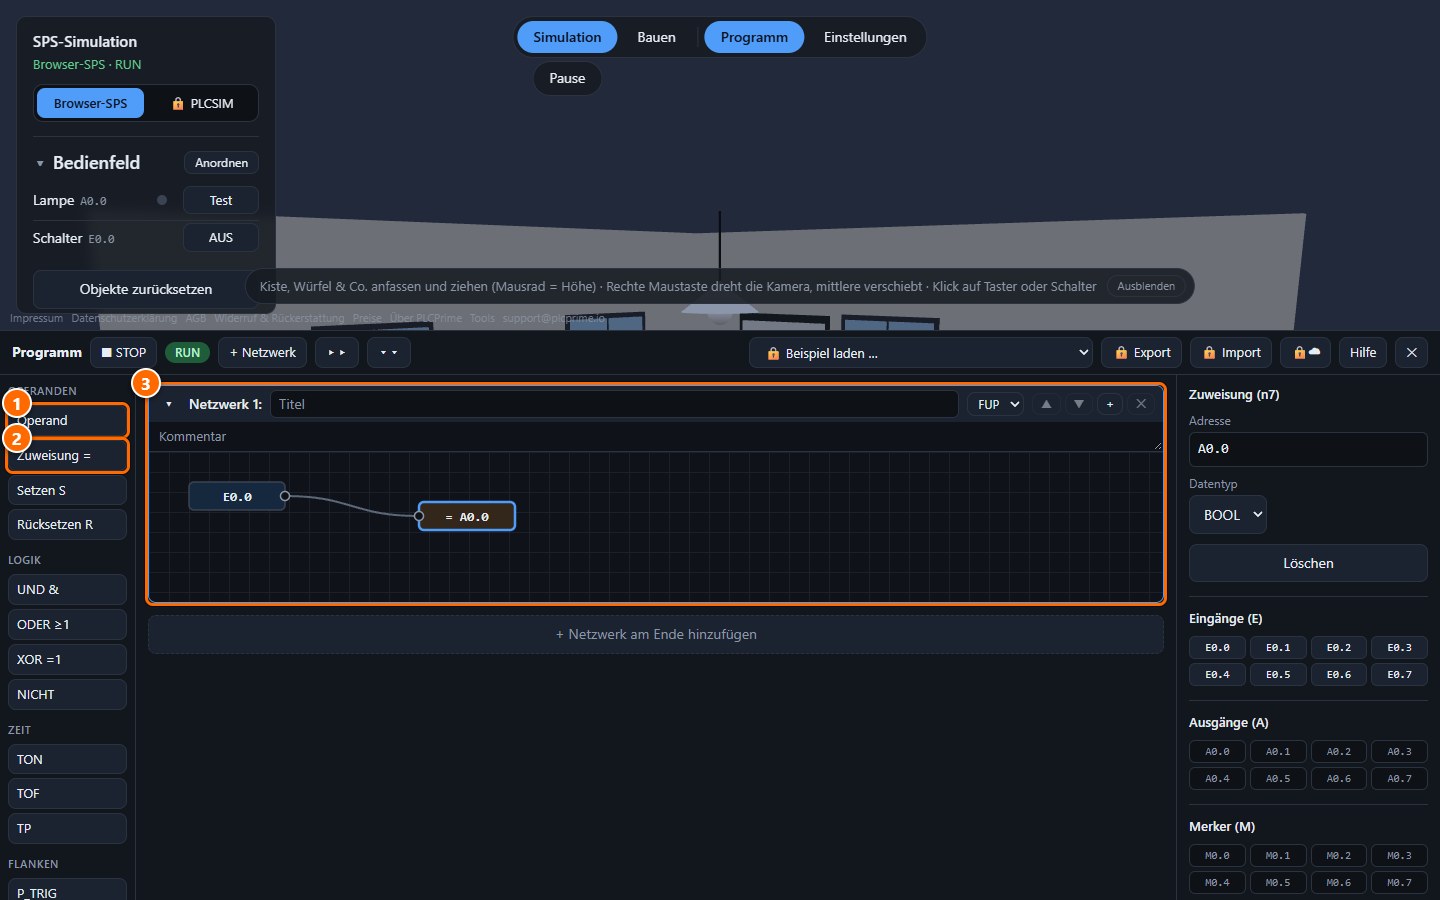
- Palette: Operand
- Palette: Zuweisung =
- Das fertige Netzwerk:
E0.0ist über eine Leitung mit= A0.0verbunden.
6. Prüfen
Schalten Sie den Schalter ein (Knopf im Bedienfeld oder ein Klick auf den Schalter in der Szene). Die Lampe leuchtet. Klicken Sie dann im Lernpfad auf Fertig prüfen.
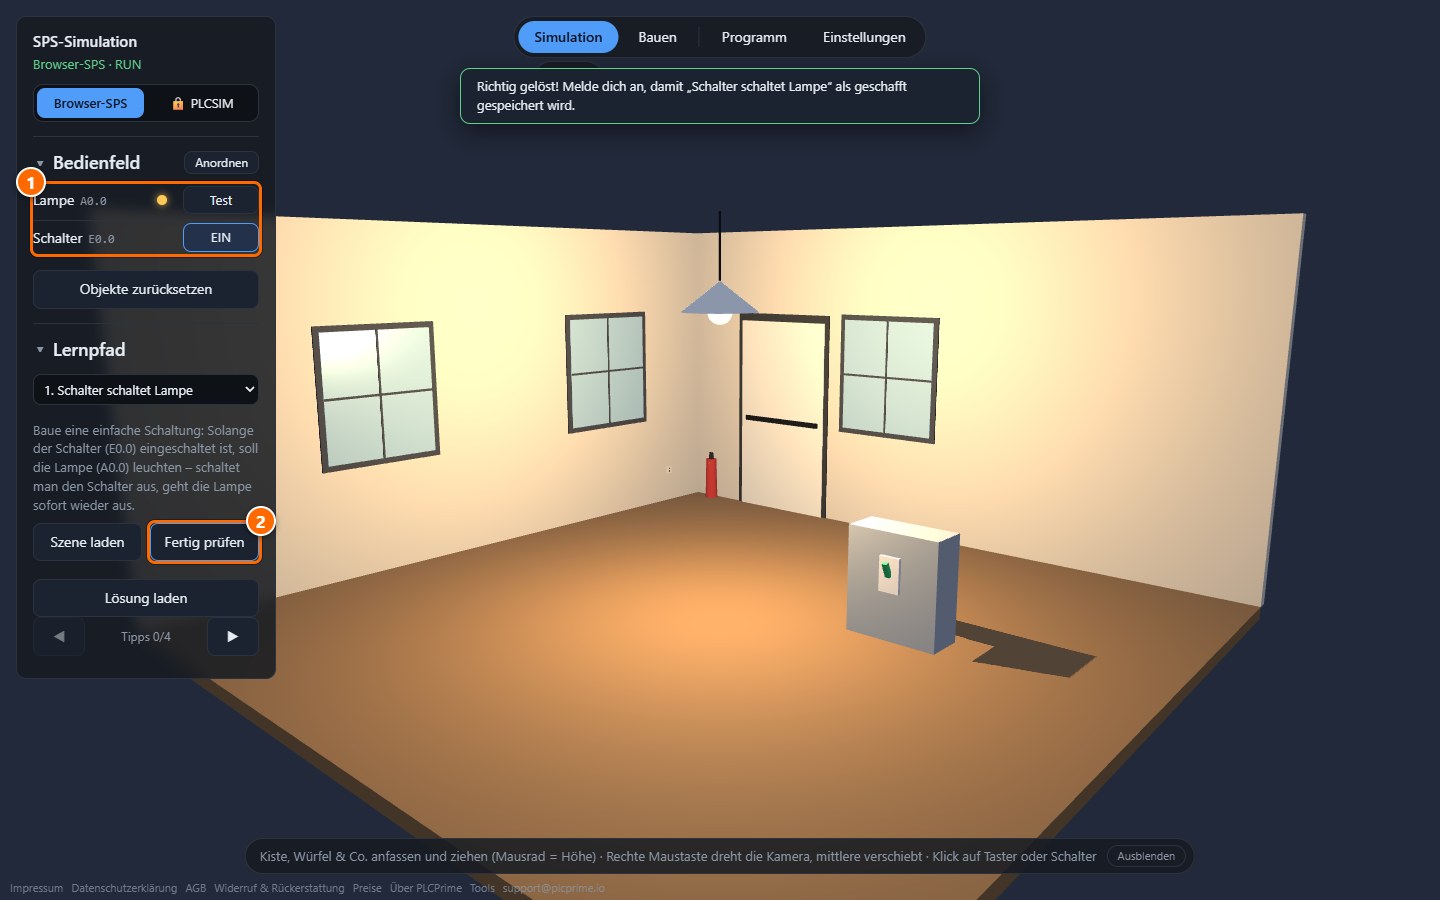
- Schalter ein, Lampe an.
- Fertig prüfen meldet „Richtig gelöst!“. Wenn Sie sich unter Einstellungen mit einem Konto anmelden (Basis ist kostenlos), merkt sich PLCPrime das Level als geschafft.
Kommt „Noch nicht ganz richtig“? Prüfen Sie, ob die Leitung wirklich verbunden ist und beide Adressen stimmen. Die Tipps zeigen Schritt für Schritt mehr, und Lösung laden zeigt das fertige Programm.
7. Eigene Anlagen bauen
Wechseln Sie in der Modusleiste zu Bauen. Rechts erscheint der Katalog Elemente hinzufügen mit Lampen, Tastern, Schaltern, Sensoren, Förderbändern und vielem mehr.
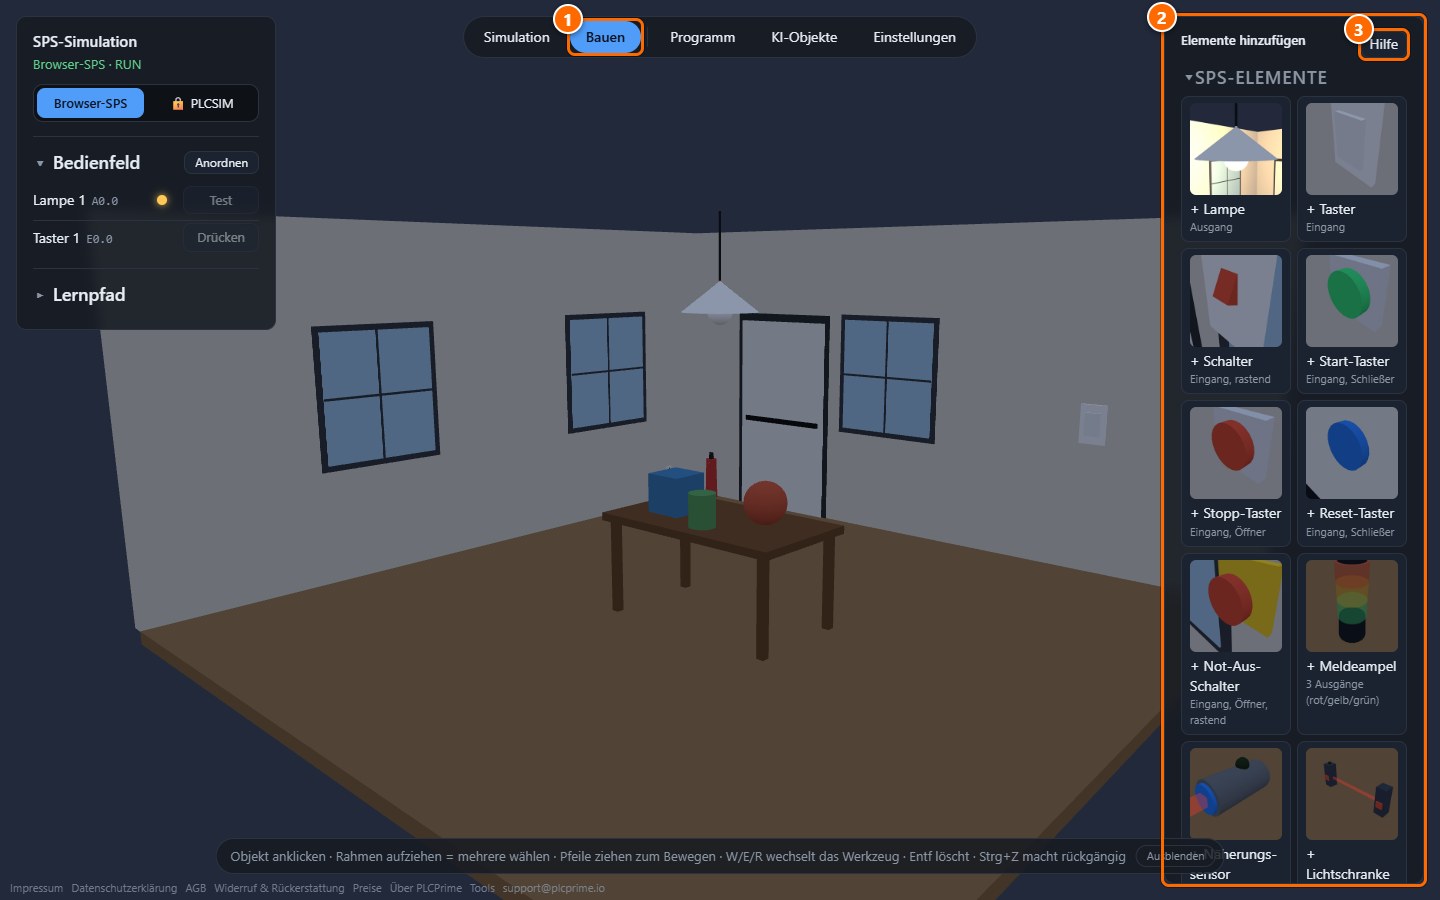
- Der Modus Bauen.
- Der Katalog: Ein Klick auf eine Karte fügt das Objekt der Szene hinzu.
- Der Knopf Hilfe erklärt jedes Objekt.
Ein Objekt klicken Sie an, bewegen es über die Pfeile und wechseln mit W, E und R das Werkzeug. Entf löscht, Strg+Z macht rückgängig. Adresse, Name und Farbe der Objekte ändern Sie im Auswahlbereich: Über die Adresse spricht das Programm das Objekt an.
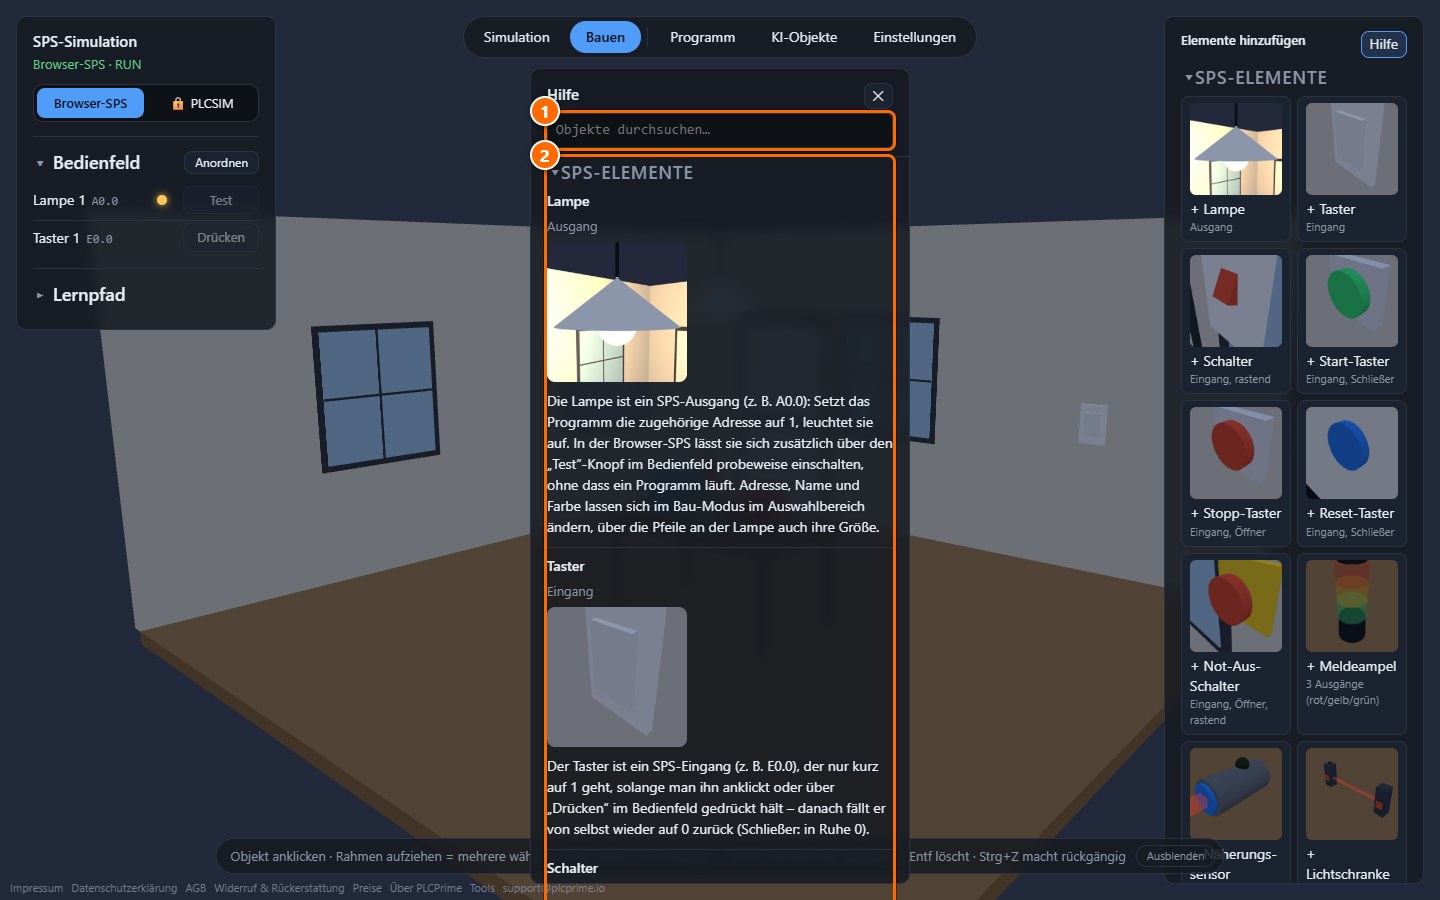
- Suchfeld: Objekte durchsuchen.
- Die Erklärungen: wofür das Objekt da ist, welche Ein- und Ausgänge es hat und was sich einstellen lässt.
Wie geht es weiter?
- Level 2 bis 5 (frei): Taster als Stromstoßschaltung, Förderband mit Start und Stopp, Kiste am Bandende anhalten, Kisten zählen. Mit Pro folgen bis Level 16 Flaschen abfüllen, Brezeln stanzen, Roboter, Paletten und das Hochregallager.
- Videos finden Sie auf unserem YouTube-Kanal.
- Eigene Projekte aus dem Siemens TIA Portal testen Sie mit dem Paket Premium und Siemens PLCSIM Advanced, siehe Über PLCPrime.
- Speichern, mehr Objekte, größere Räume und alle 16 Level bieten Pro und Premium: Preise.
- Fragen? Schreiben Sie an support@plcprime.io.
Siemens, TIA Portal und PLCSIM Advanced sind Marken der Siemens AG. PLCPrime ist ein unabhängiges Produkt und nicht mit Siemens verbunden.
Getting started with PLCPrime
PLCPrime is a PLC simulation that runs right in your browser. In about ten minutes you will get to know the interface, switch a lamp, look at a control program and solve the first task of the learning path – with a program you build yourself.
What you need: a computer (laptop or desktop; the interface is too small for a phone) with an up-to-date browser and a mouse. No installation and no account. The Basic plan is free forever. Please note: in the free plan nothing is saved – after a reload PLCPrime starts with the start scene again. Saving comes with Pro (Pricing).
1. Get to know the interface
Open plcprime.io. You see a small room with a table, a lamp and a push button.
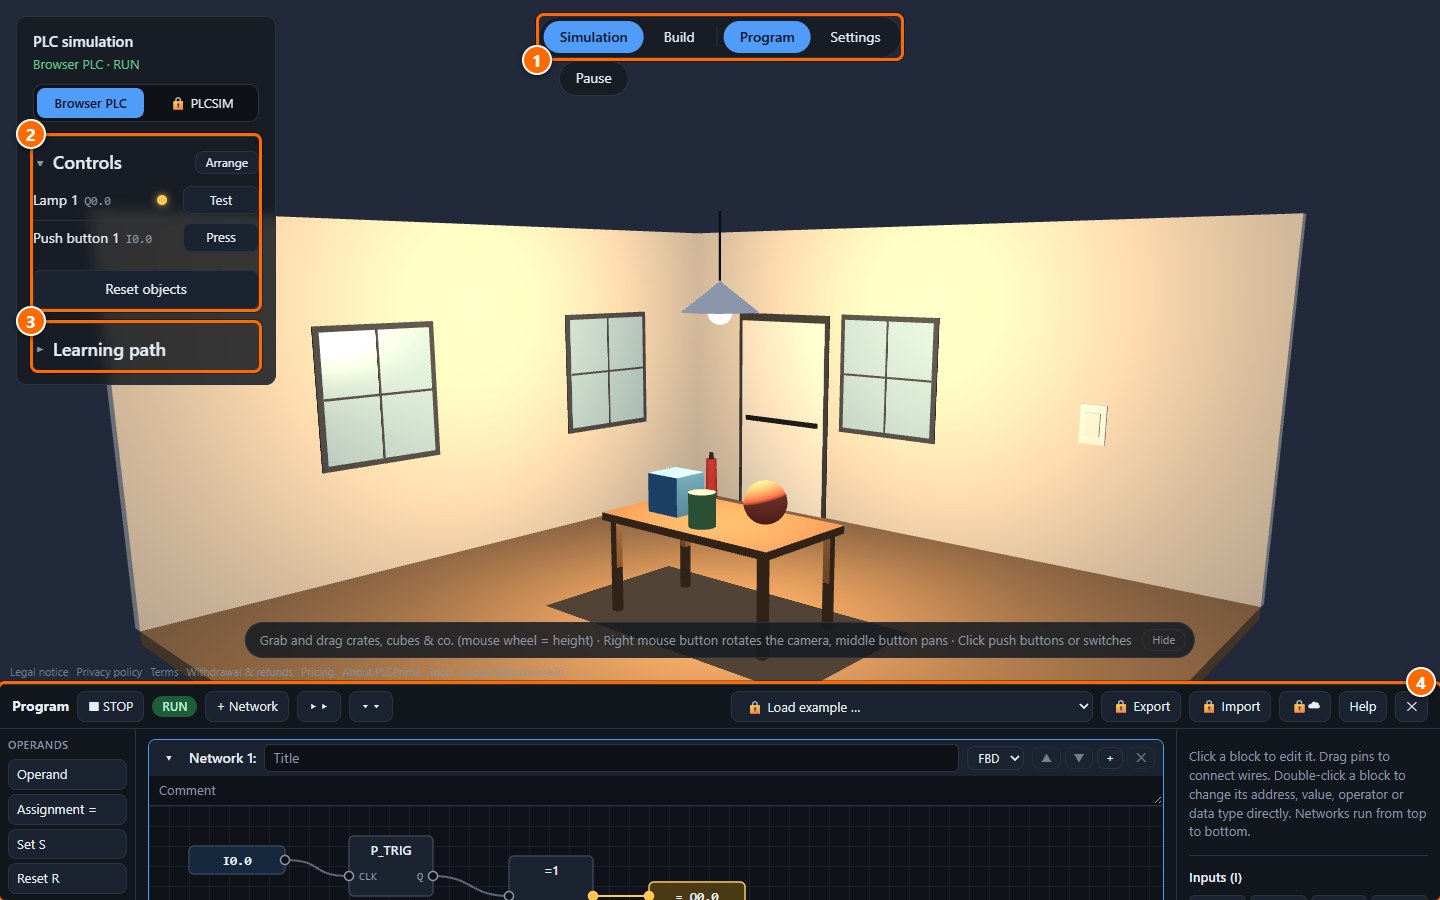
- Mode bar: Simulation runs the plant, Build adds and moves objects, Program shows or hides the program editor, and under Settings you change language, brightness and graphics quality.
- Controls: all push buttons, switches and lamps of the scene are listed here. “Reset objects” puts everything back to its build position.
- Learning path: tasks with ready-made scenes, 16 levels. The first five are free, from level 6 on you need Pro.
- Program editor: on your first visit it peeks out at the bottom as a narrow strip. Drag its top edge upwards for more room (a double click on the edge resets the height).
You steer the 3D scene with the mouse: the right mouse button rotates the camera, the middle button pans the view. You grab crates, cubes and other parts and drag them (mouse wheel = height). A click on a push button or switch in the scene operates it.
2. Switch the lamp
In the controls, click Press next to “Push button 1”. The lamp goes out, a second press switches it on again. On your first visit the lamp is already on.
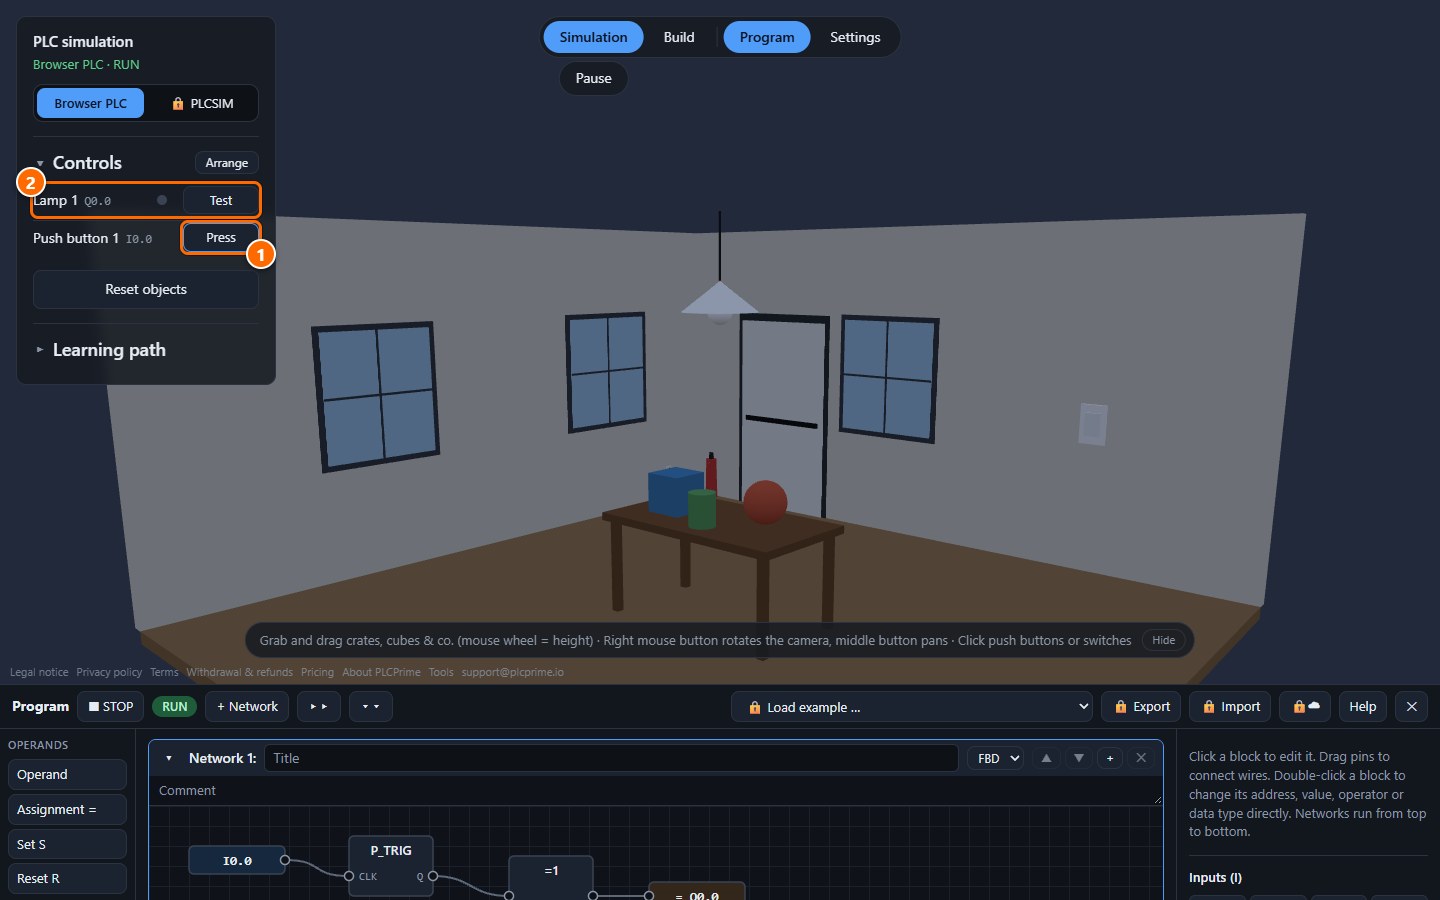
- The Press button operates the push button. It is an input of the controller with the address
I0.0. - The lamp is an output with the address
Q0.0. The Test button switches it on for a trial as long as you hold it.
Inputs (I) read something from the plant, outputs (Q) control something in the plant. What happens between push button and lamp is decided by the program.
3. Look at the program
Drag the program strip upwards. You see the example program that connects the push button to the lamp.
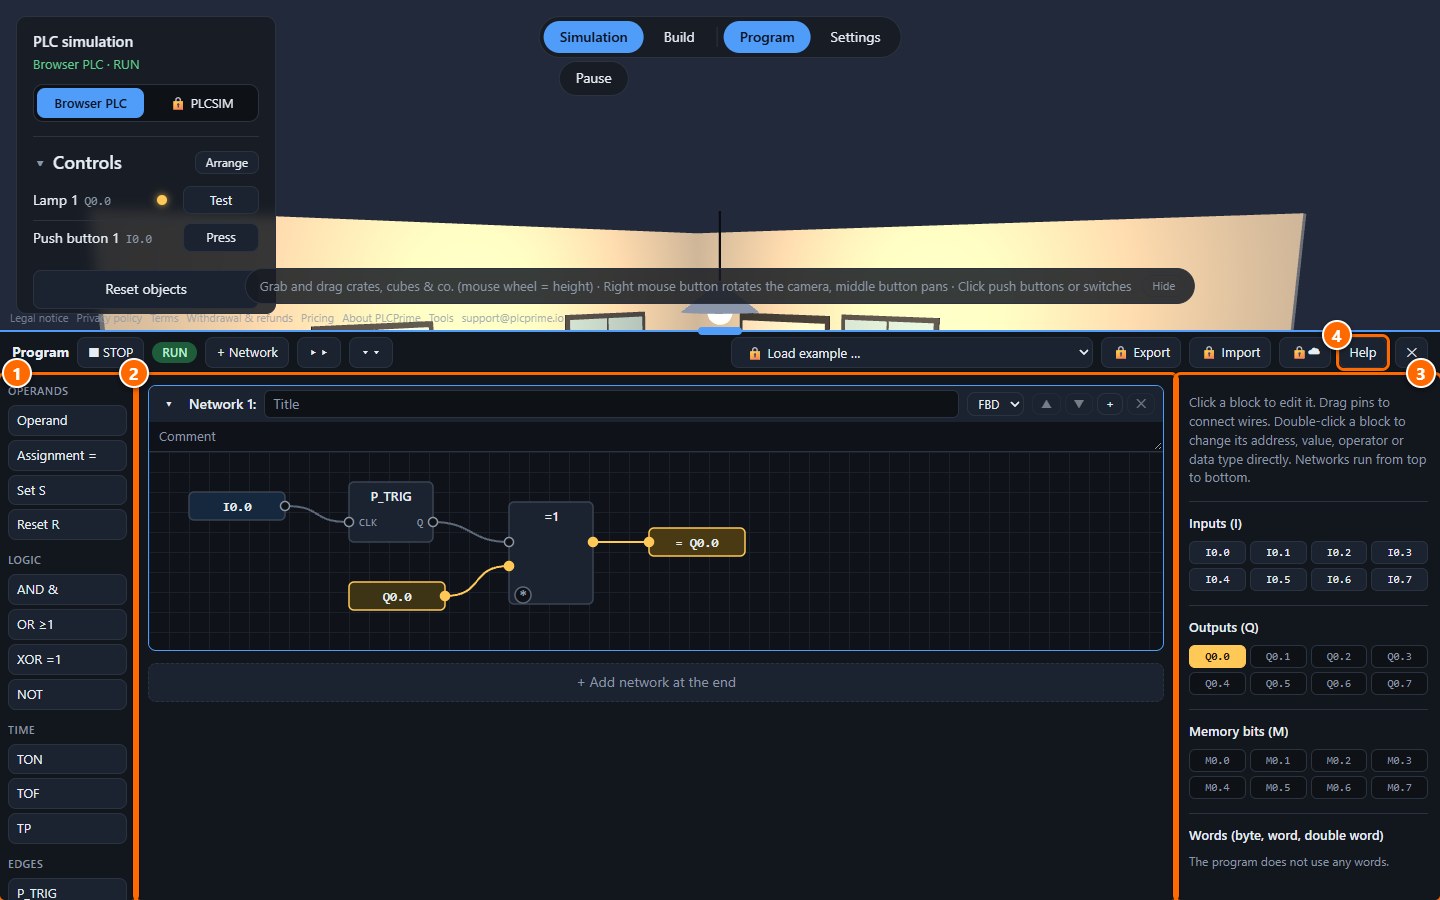
- Palette: the blocks. Operands read inputs or set outputs; there are also logic (AND, OR, NOT), timers, edges, counters and memory. A click inserts the block into the active network.
- Network: the program as a function block diagram (FBD). Networks run from top to bottom. In the example the operand
I0.0reads the push button, P_TRIG detects the press (rising edge), and the lampQ0.0is toggled with every press. Each network can alternatively be written in ladder diagram (LAD) or SCL (selection at the top right of the network). - Inputs, outputs, memory bits: every address with its current value. Yellow means 1. A click toggles the address.
- Help: explains AND, OR, timers, counters, comparisons and the other functions.
By the way, this example program is a solution of level 2 (“Push button as an impulse relay”).
4. The first task: level 1
Open the Learning path on the left. Level 1 is “Switch turns on a lamp”.
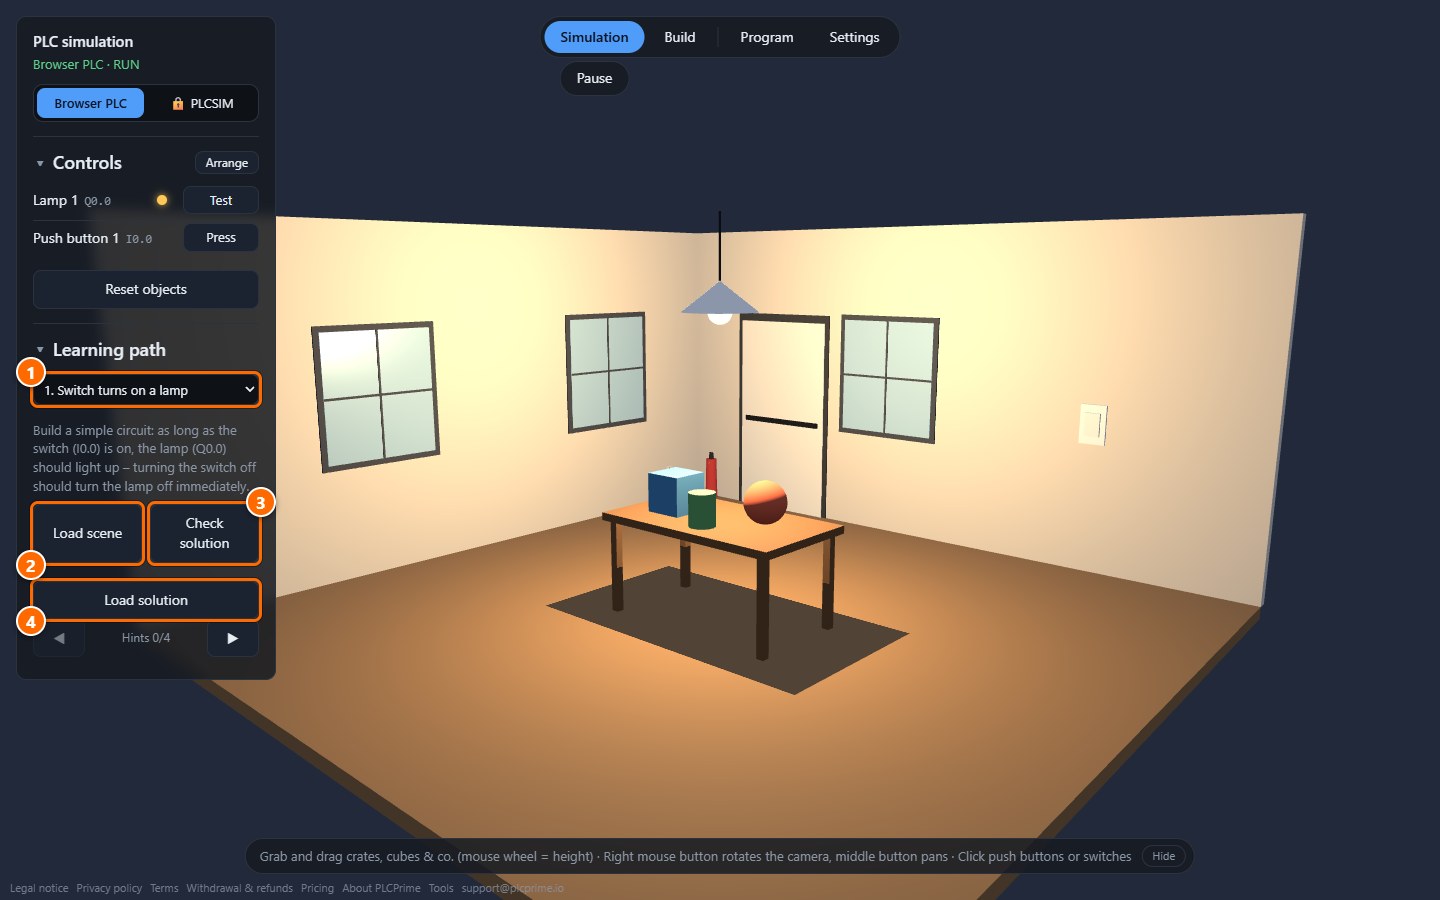
- Level selection: the task is shown below it.
- Load scene: replaces the current scene with the scene of the level. The application asks first, answer “Yes”.
- Check solution: checks whether your program solves the task.
- Load solution: loads the finished program and replaces yours (levels 1 to 5 for everyone). Below the button, the arrows ◀ ▶ reveal hints one at a time – each one gives away a little more.
Click Load scene and confirm. Instead of table and push button you now see a switch and the lamp.
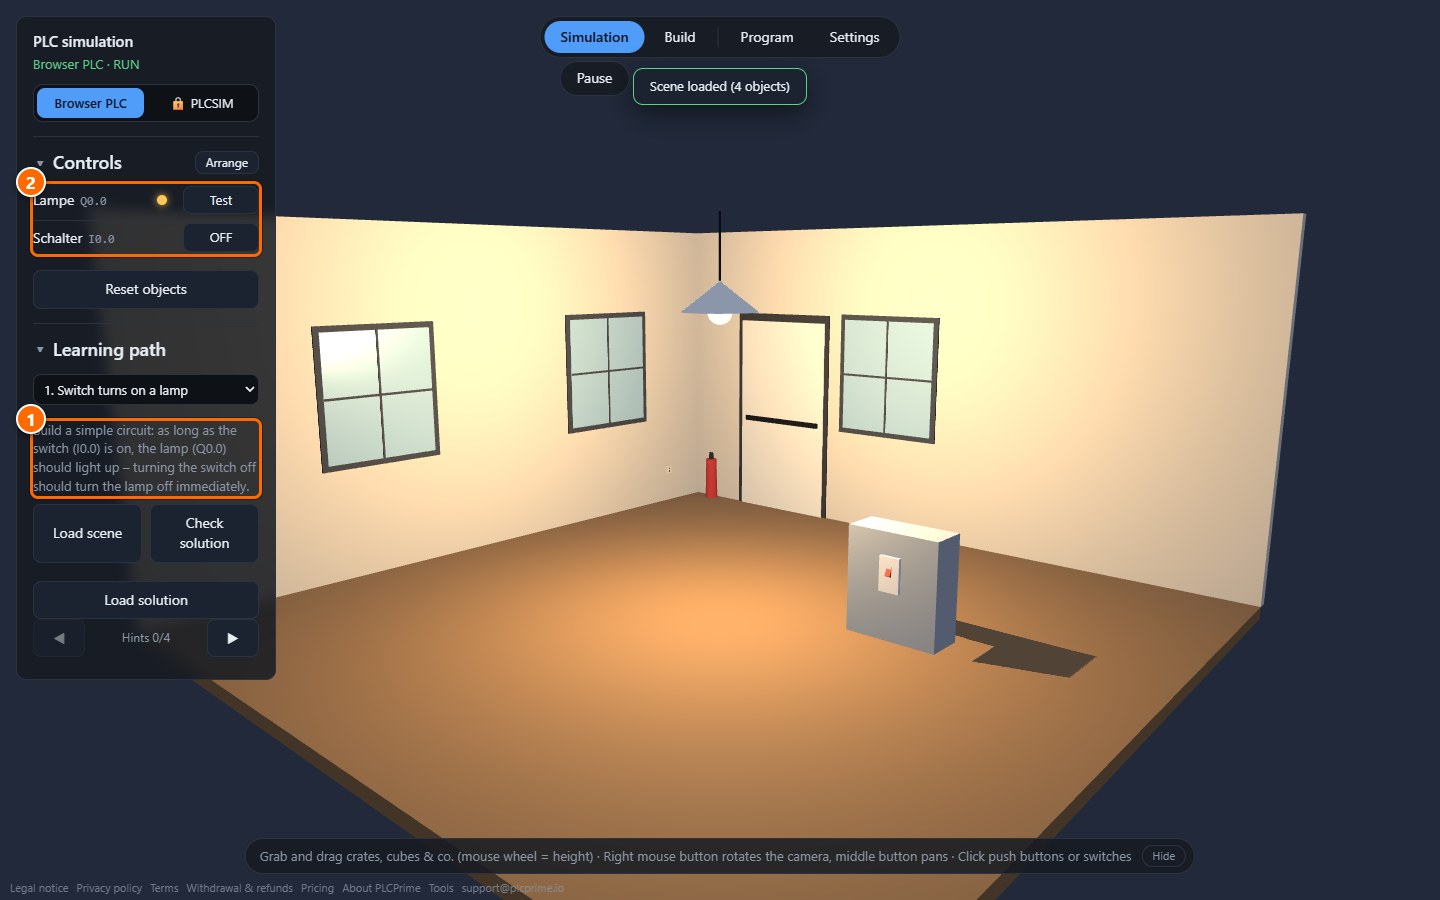
- The task: as long as the switch (
I0.0) is on, the lamp (Q0.0) should light up. Turning the switch off turns the lamp off immediately. - The controls now show lamp and switch. (The objects of this scene are labelled “Lampe” and “Schalter” in German.)
5. Build the program yourself
The solution needs only two blocks: an operand that reads the switch and an assignment that switches the lamp.
- Open the program editor (Program button) and click + Network. Network 2 appears below the example.
- In the palette, click Operand. A block
I0.0appears; it reads the switch. - Click Assignment =. A block
= Q0.0appears; it switches the lamp. The preset addresses already fit. To change them, double-click the block, or click it and enter the address on the right. - Drag the assignment to the right with the mouse to leave some room.
- Drag from the round connector on the right of the operand to the connector on the left of the assignment. The wire is in place.
- You no longer need the example in network 1. Click ✕ in its header and confirm with “Yes”. This is optional, though: networks run from top to bottom, and a later one overwrites an output that an earlier one has written.
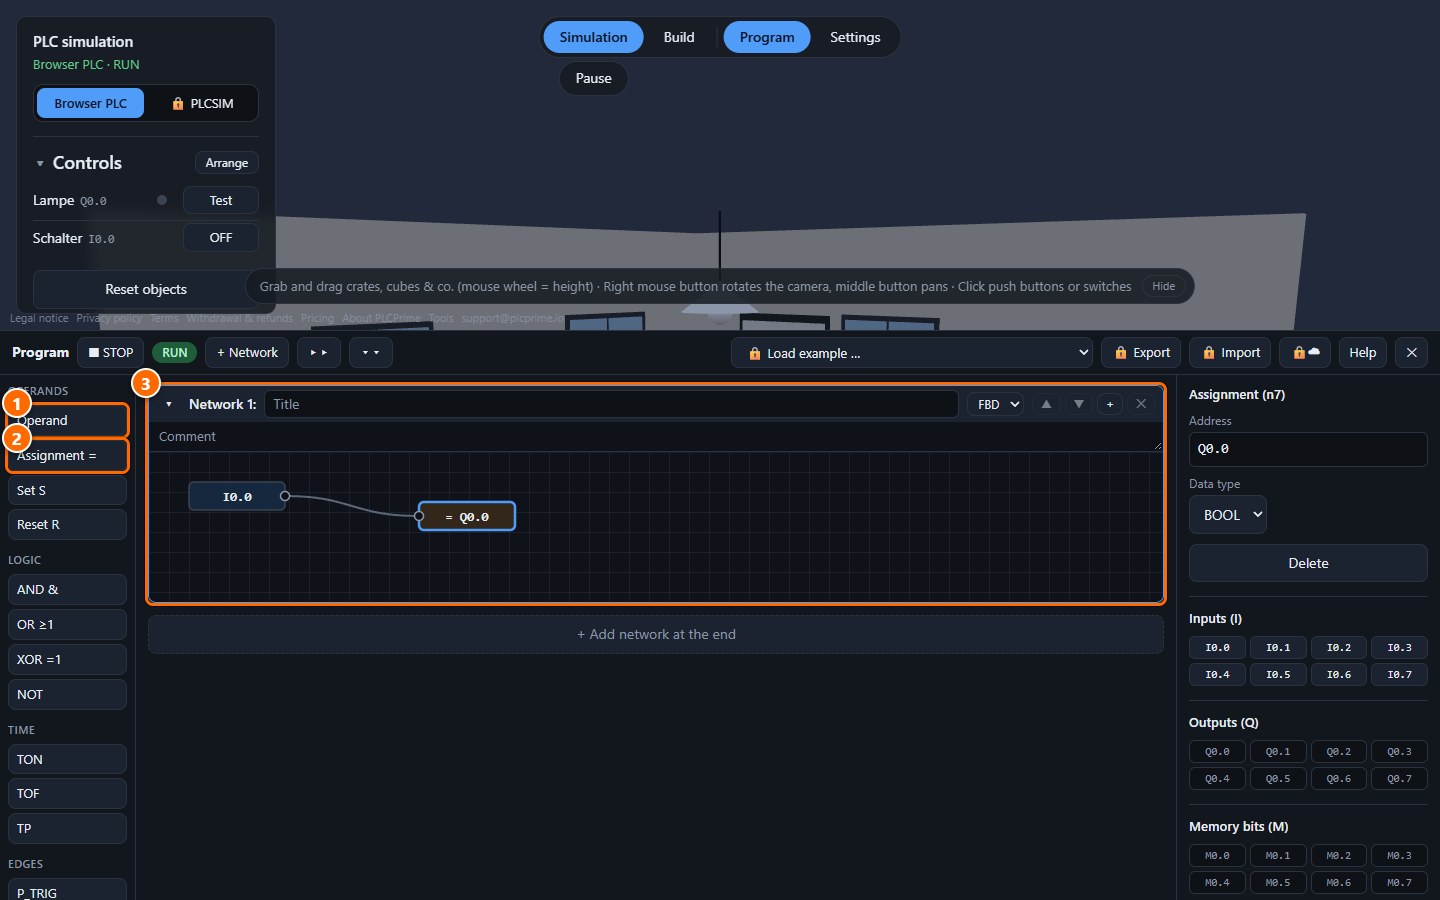
- Palette: Operand
- Palette: Assignment =
- The finished network:
I0.0is connected to= Q0.0by a wire.
6. Check it
Switch the switch on (button in the controls, or a click on the switch in the scene). The lamp lights up. Then click Check solution in the learning path.
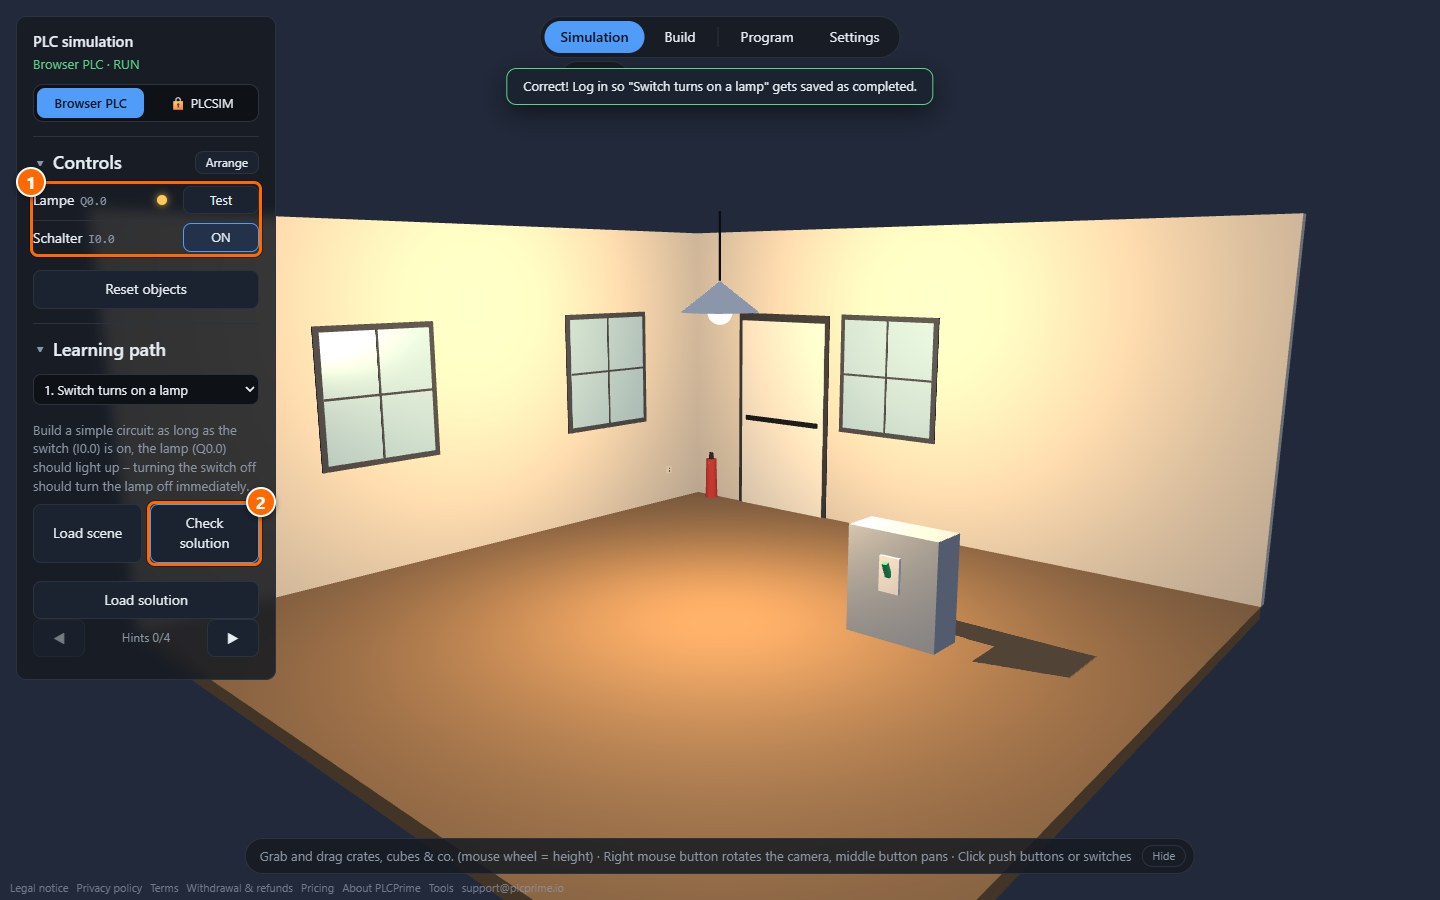
- Switch on, lamp on.
- Check solution reports that the task is solved. If you log in with an account under Settings (Basic is free), PLCPrime remembers the level as completed.
Does it say the circuit is not quite right? Check that the wire is really connected and both addresses are correct. The hints reveal more step by step, and Load solution shows the finished program.
7. Build your own plants
Switch to Build in the mode bar. On the right the catalogue Add elements appears, with lamps, push buttons, switches, sensors, conveyors and much more.
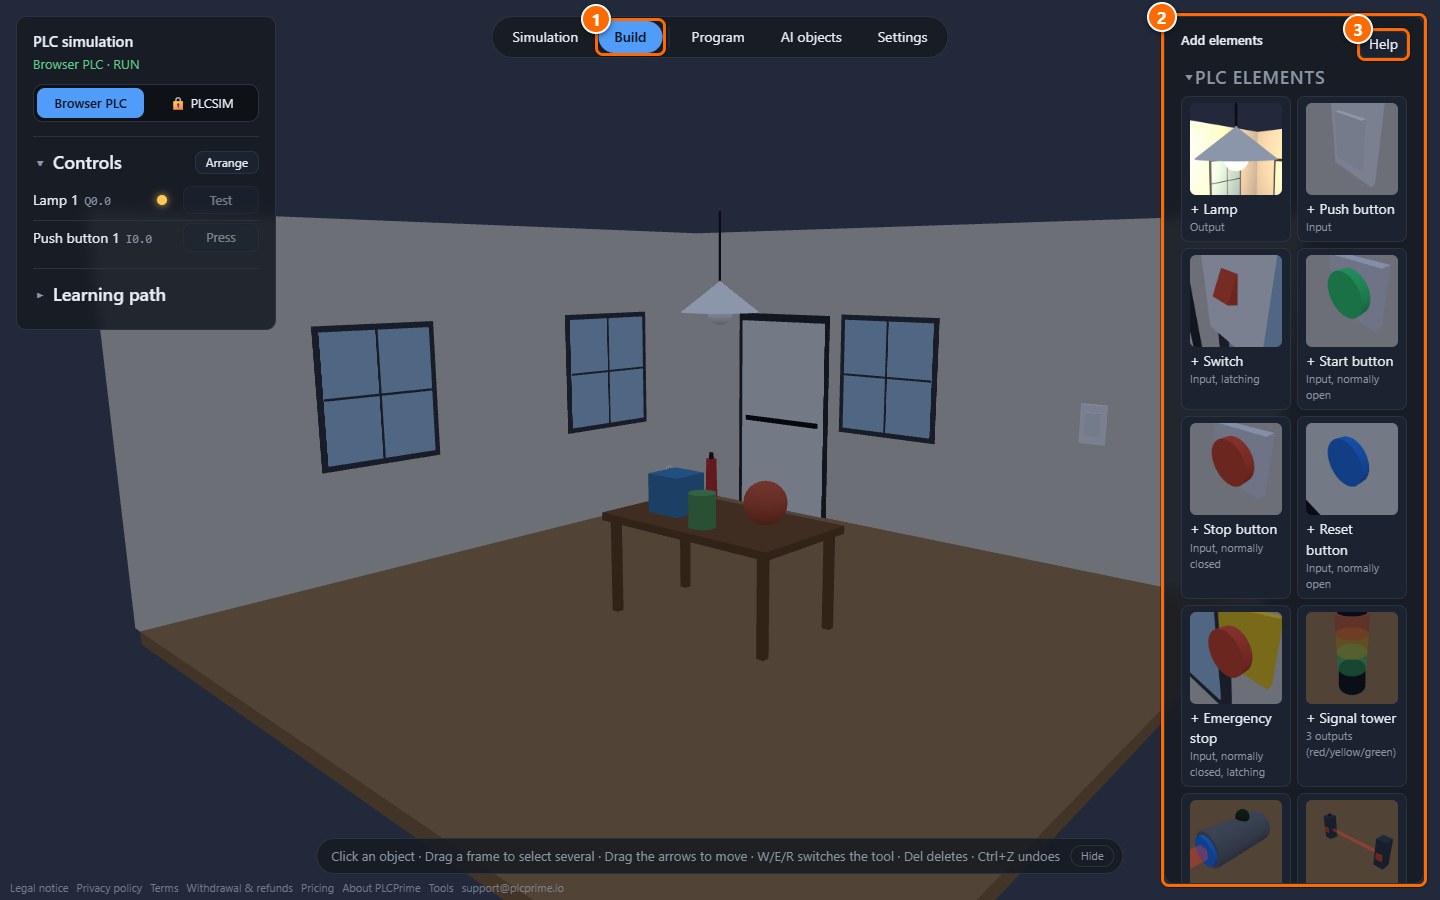
- The Build mode.
- The catalogue: a click on a card adds the object to the scene.
- The Help button explains every object.
Click an object, move it with the arrows, and switch tools with W, E and R. Del deletes, Ctrl+Z undoes. You change address, name and colour of objects in the selection area: the program addresses the object through its address.
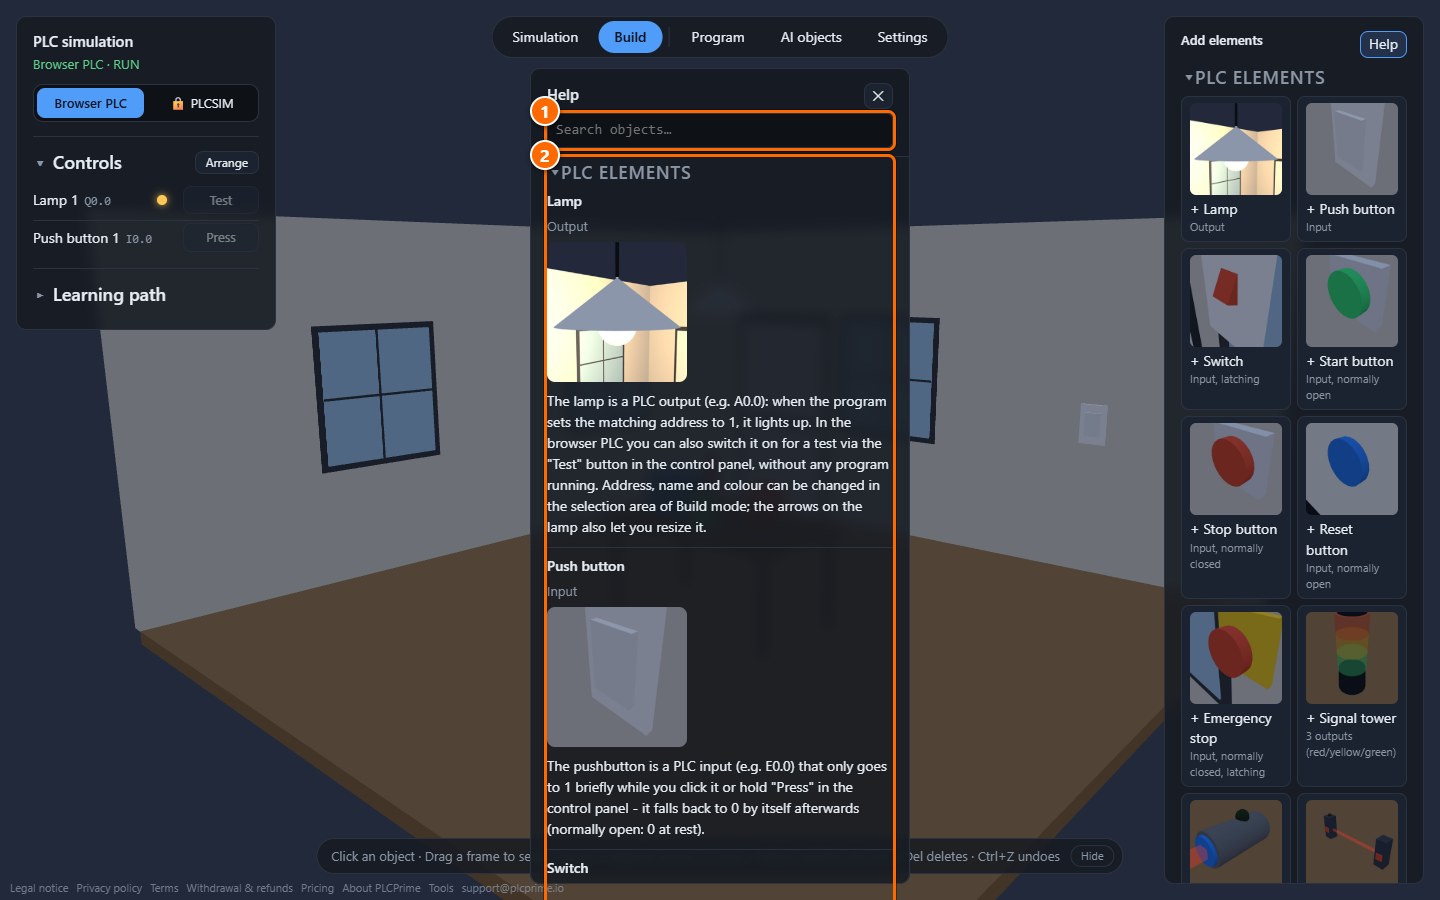
- Search field: search the objects.
- The explanations: what the object is for, which inputs and outputs it has and what can be set.
What next?
- Levels 2 to 5 (free): push button as an impulse relay, conveyor with start and stop, stop the crate at the end of the belt, counting crates. With Pro, levels up to 16 follow: filling bottles, punching pretzels, robots, pallets and the high-bay rack.
- Videos are on our YouTube channel.
- Your own projects from Siemens TIA Portal you test with the Premium plan and Siemens PLCSIM Advanced, see About PLCPrime.
- Saving, more objects, larger rooms and all 16 levels come with Pro and Premium: Pricing.
- Questions? Write to support@plcprime.io.
Siemens, TIA Portal and PLCSIM Advanced are trademarks of Siemens AG. PLCPrime is an independent product and is not affiliated with Siemens.
Primi passi con PLCPrime
PLCPrime è una simulazione PLC che funziona direttamente nel browser. In circa dieci minuti conosci l'interfaccia, accendi una lampada, guardi un programma di controllo e risolvi il primo esercizio del percorso di apprendimento – con un programma che costruisci tu stesso.
Cosa ti serve: un computer (portatile o desktop; per lo smartphone l'interfaccia è troppo piccola) con un browser aggiornato e un mouse. Nessuna installazione e nessun account. Il piano Basic è gratuito per sempre. Attenzione: nel piano gratuito non viene salvato nulla – dopo aver ricaricato la pagina PLCPrime riparte dalla scena iniziale. Il salvataggio è disponibile con Pro (Prezzi).
1. Conoscere l'interfaccia
Apri plcprime.io. Vedi una piccola stanza con un tavolo, una lampada e un pulsante.
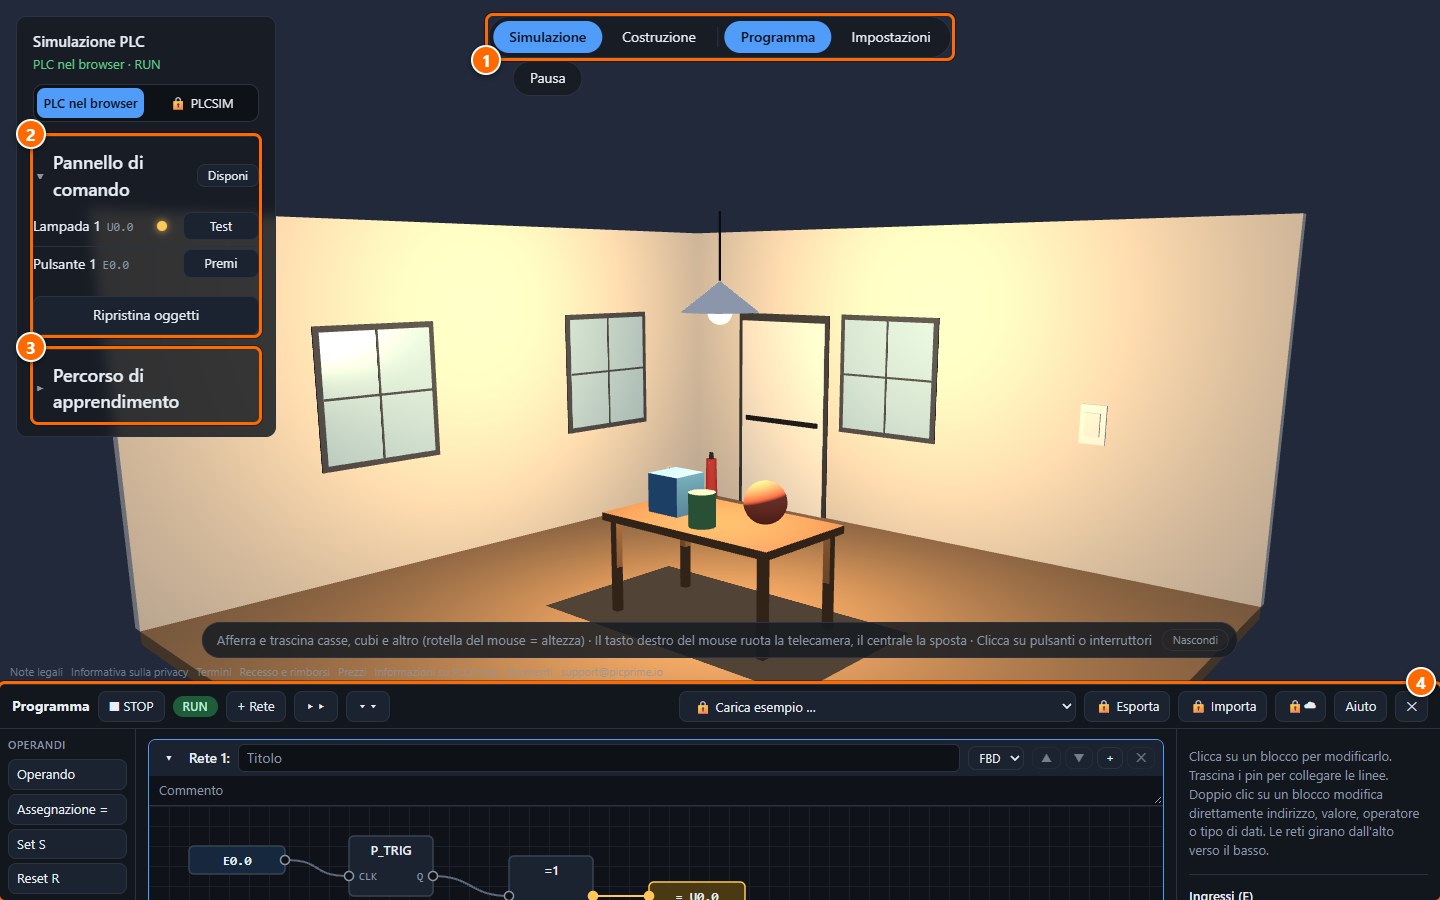
- Barra delle modalità: Simulazione fa funzionare l'impianto, Costruzione aggiunge e sposta gli oggetti, Programma mostra o nasconde l'editor del programma, in Impostazioni cambi lingua, luminosità e qualità grafica.
- Pannello di comando: qui trovi tutti i pulsanti, gli interruttori e le lampade della scena. “Ripristina oggetti” riporta tutto alla posizione di costruzione.
- Percorso di apprendimento: esercizi con scene pronte, 16 livelli. I primi cinque sono gratuiti, dal livello 6 serve Pro.
- Editor del programma: alla prima visita sporge in basso come una striscia stretta. Trascinalo verso l'alto dal bordo superiore per avere più spazio (un doppio clic sul bordo ripristina l'altezza).
La scena 3D si controlla con il mouse: con il tasto destro ruoti la telecamera, con quello centrale sposti la vista. Casse, cubi e altri pezzi si afferrano e si trascinano (rotella del mouse = altezza). Un clic su un pulsante o su un interruttore nella scena lo aziona.
2. Accendere la lampada
Nel pannello di comando clicca Premi accanto a “Pulsante 1”. La lampada si spegne, una seconda pressione la riaccende. Alla prima visita la lampada è già accesa.
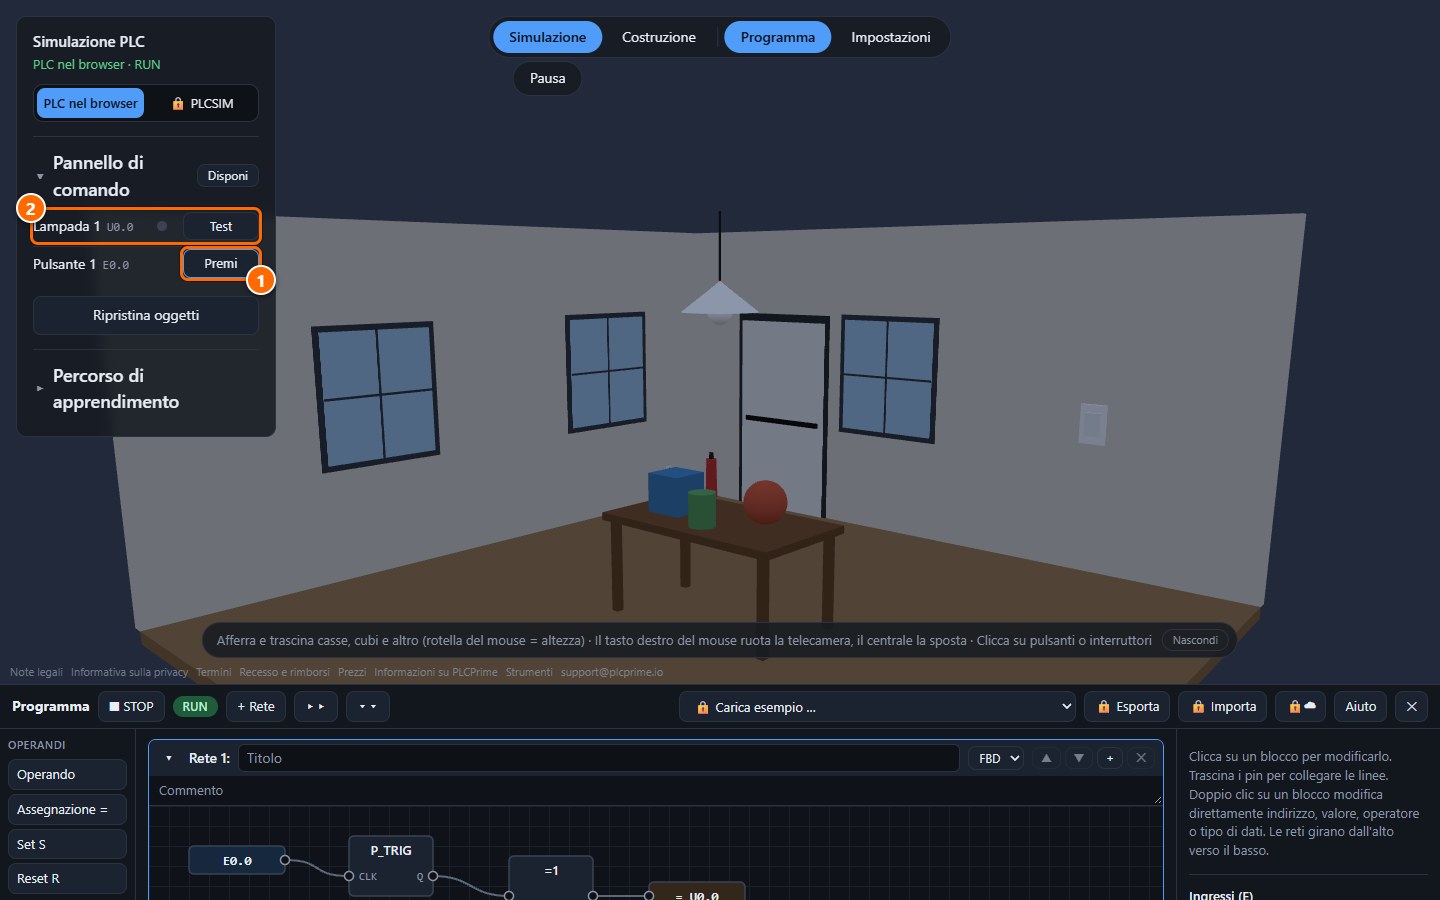
- Il pulsante Premi aziona il pulsante. È un ingresso del controllore con l'indirizzo
E0.0. - La lampada è un'uscita con l'indirizzo
U0.0. Con il pulsante Test la accendi per prova finché lo tieni premuto.
Gli ingressi (E) leggono qualcosa dall'impianto, le uscite (U) comandano qualcosa nell'impianto. Cosa succede tra pulsante e lampada lo decide il programma.
3. Guardare il programma
Trascina la striscia del programma verso l'alto. Vedi il programma di esempio che collega il pulsante alla lampada.
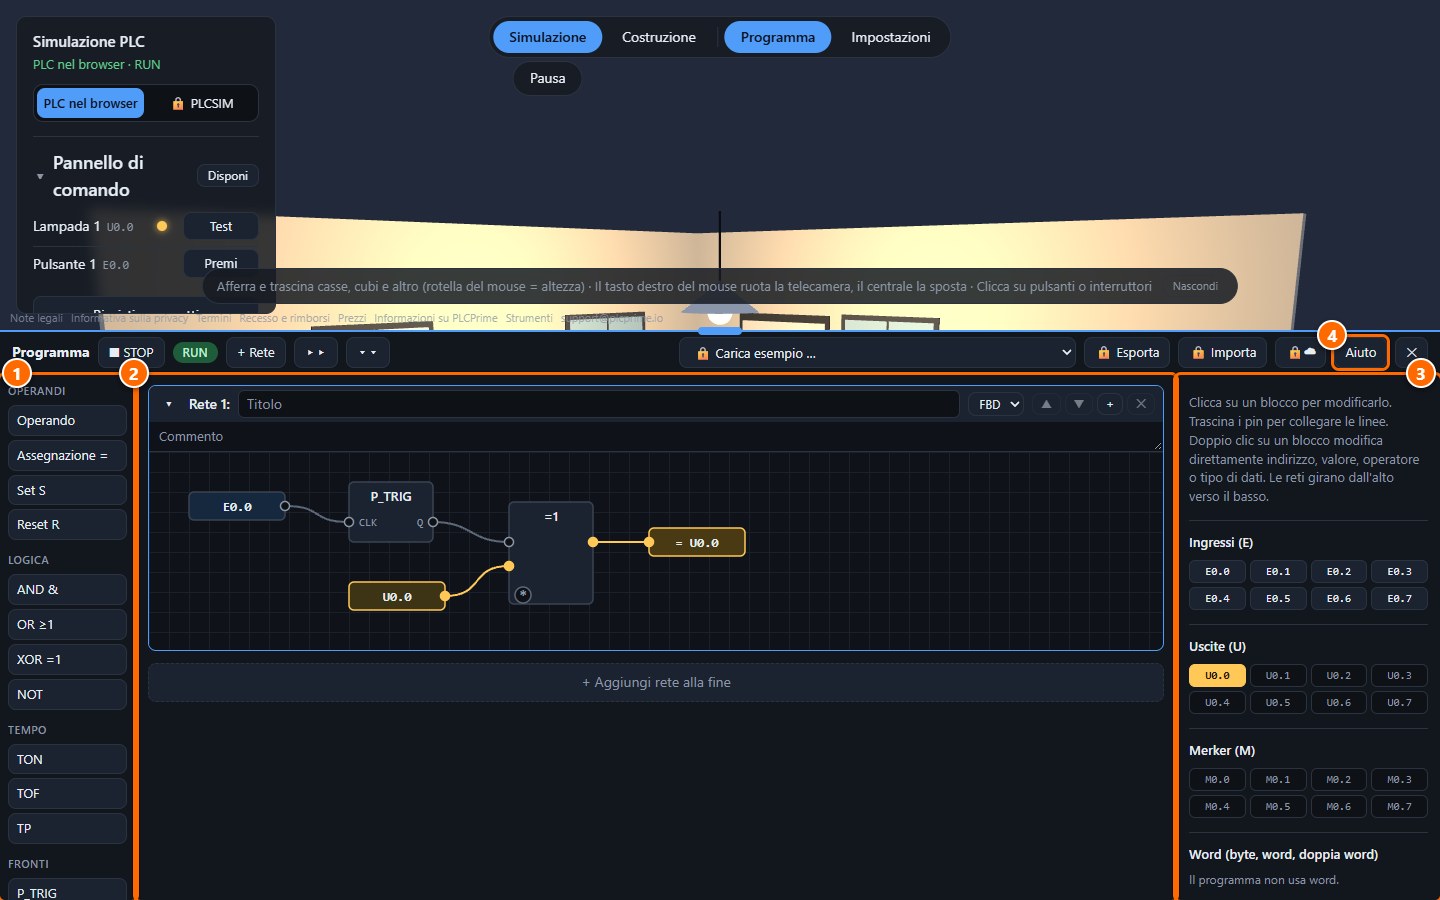
- Tavolozza: i blocchi. Gli operandi leggono ingressi o impostano uscite; ci sono inoltre logica (AND, OR, NOT), tempi, fronti, contatori e memoria. Un clic inserisce il blocco nella rete attiva.
- Rete: il programma come schema a blocchi funzionali (FBD). Le reti vengono eseguite dall'alto verso il basso. Nell'esempio l'operando
E0.0legge il pulsante, P_TRIG riconosce la pressione (fronte di salita) e la lampadaU0.0viene commutata a ogni pressione. Ogni rete può essere scritta anche in schema a contatti (KOP) o in SCL (selezione in alto a destra nella rete). - Ingressi, uscite, merker: ogni indirizzo con il suo valore attuale. Giallo significa 1. Un clic commuta l'indirizzo.
- Aiuto: spiega AND, OR, timer, contatori, confronti e le altre funzioni.
Questo programma di esempio è tra l'altro una soluzione del livello 2 (“Pulsante come relè a impulsi”).
4. Il primo esercizio: livello 1
Apri a sinistra il Percorso di apprendimento. Il livello 1 è “Interruttore accende una lampada”.
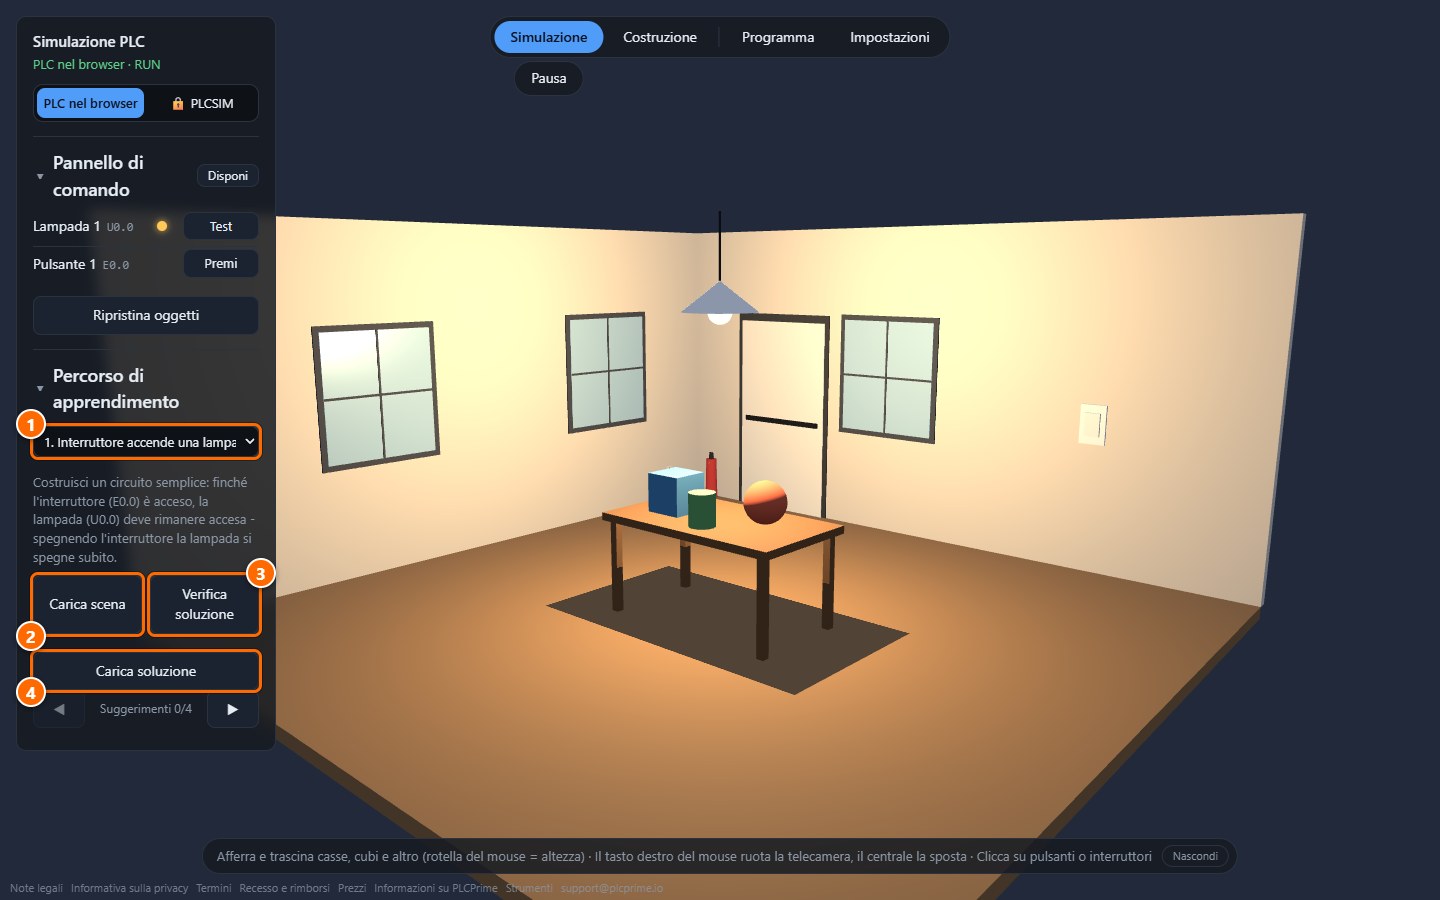
- Scelta del livello: sotto trovi l'esercizio.
- Carica scena: sostituisce la scena attuale con quella del livello. L'applicazione chiede prima conferma, rispondi “Sì”.
- Verifica soluzione: controlla se il tuo programma risolve l'esercizio.
- Carica soluzione: carica il programma finito e sostituisce il tuo (livelli da 1 a 5 per tutti). Sotto il pulsante, le frecce ◀ ▶ rivelano i suggerimenti uno alla volta – ognuno svela un po' di più.
Clicca Carica scena e conferma. Al posto del tavolo e del pulsante ora vedi un interruttore e la lampada.
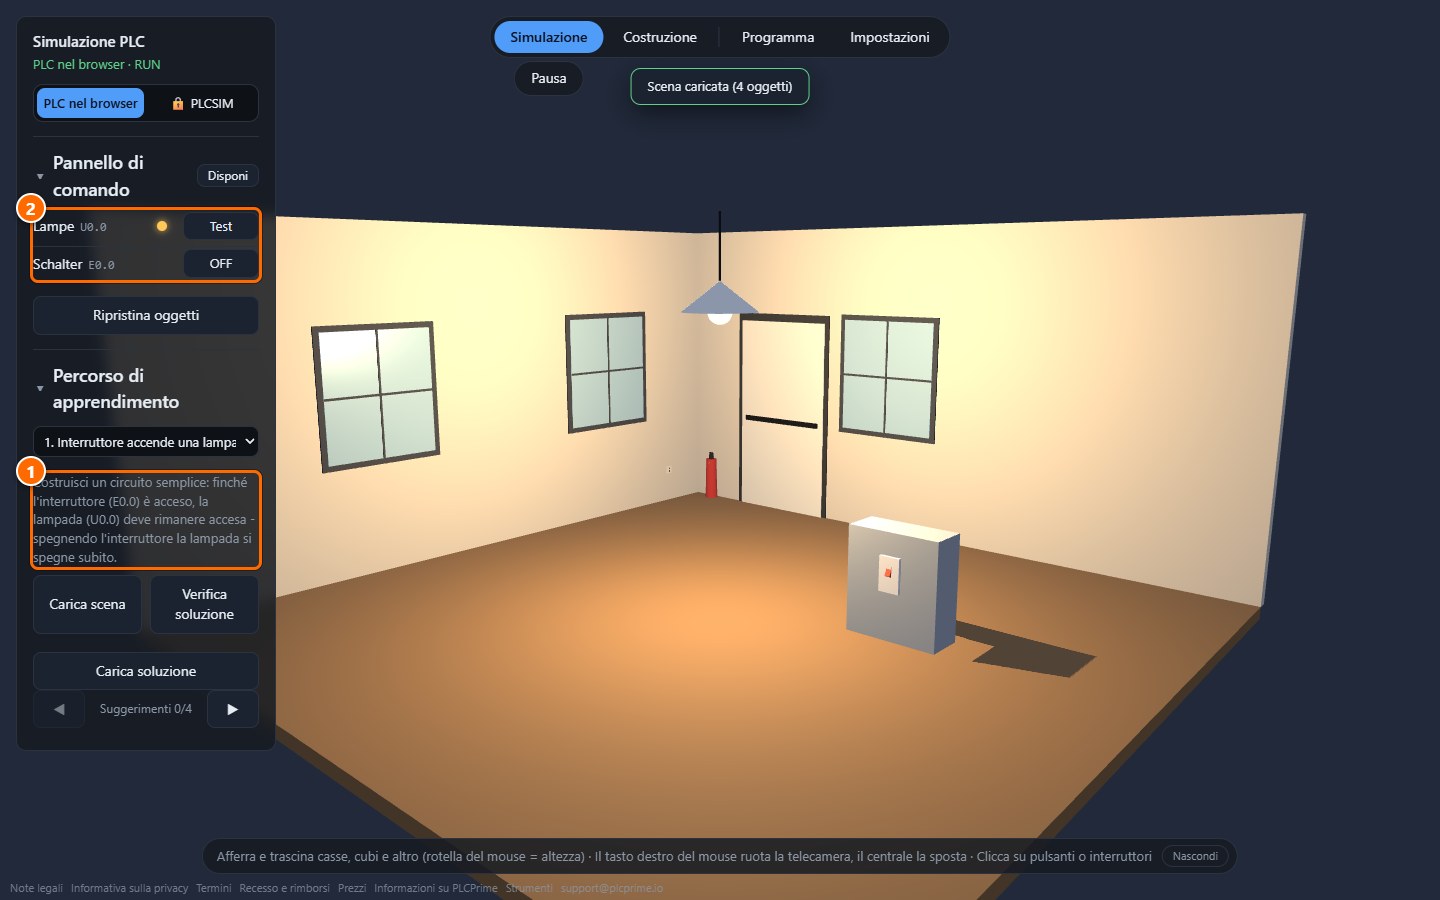
- L'esercizio: finché l'interruttore (
E0.0) è acceso, la lampada (U0.0) deve rimanere accesa. Spegnendo l'interruttore la lampada si spegne subito. - Il pannello di comando ora mostra lampada e interruttore. (Gli oggetti di questa scena hanno i nomi tedeschi “Lampe” e “Schalter”.)
5. Costruire il programma da solo
La soluzione richiede solo due blocchi: un operando che legge l'interruttore e un'assegnazione che comanda la lampada.
- Apri l'editor del programma (pulsante Programma) e clicca + Rete. Sotto l'esempio compare la rete 2.
- Nella tavolozza clicca Operando. Compare un blocco
E0.0, che legge l'interruttore. - Clicca Assegnazione =. Compare un blocco
= U0.0, che comanda la lampada. Gli indirizzi preimpostati vanno già bene. Per cambiarli fai doppio clic sul blocco oppure cliccalo e inserisci l'indirizzo a destra. - Trascina l'assegnazione verso destra con il mouse, per lasciare spazio.
- Trascina dal connettore rotondo a destra dell'operando al connettore a sinistra dell'assegnazione. Il collegamento è fatto.
- L'esempio nella rete 1 non ti serve più. Clicca ✕ nella sua intestazione e conferma con “Sì”. Non è obbligatorio: le reti vengono eseguite dall'alto verso il basso e una successiva sovrascrive un'uscita scritta da una precedente.
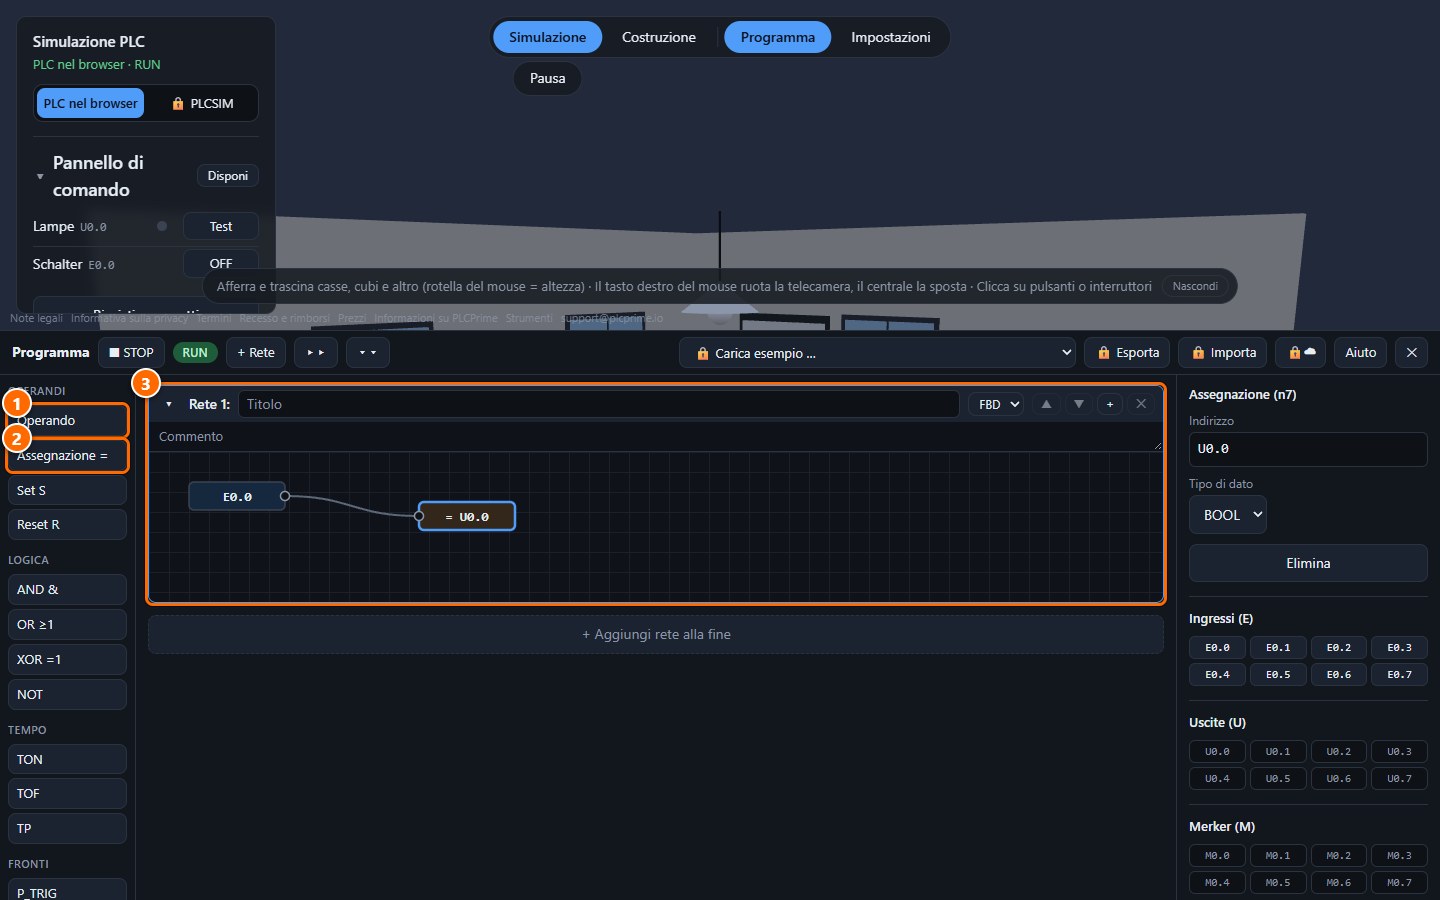
- Tavolozza: Operando
- Tavolozza: Assegnazione =
- La rete finita:
E0.0è collegato a= U0.0da un filo.
6. Verificare
Accendi l'interruttore (pulsante nel pannello di comando oppure un clic sull'interruttore nella scena). La lampada si accende. Poi clicca Verifica soluzione nel percorso di apprendimento.
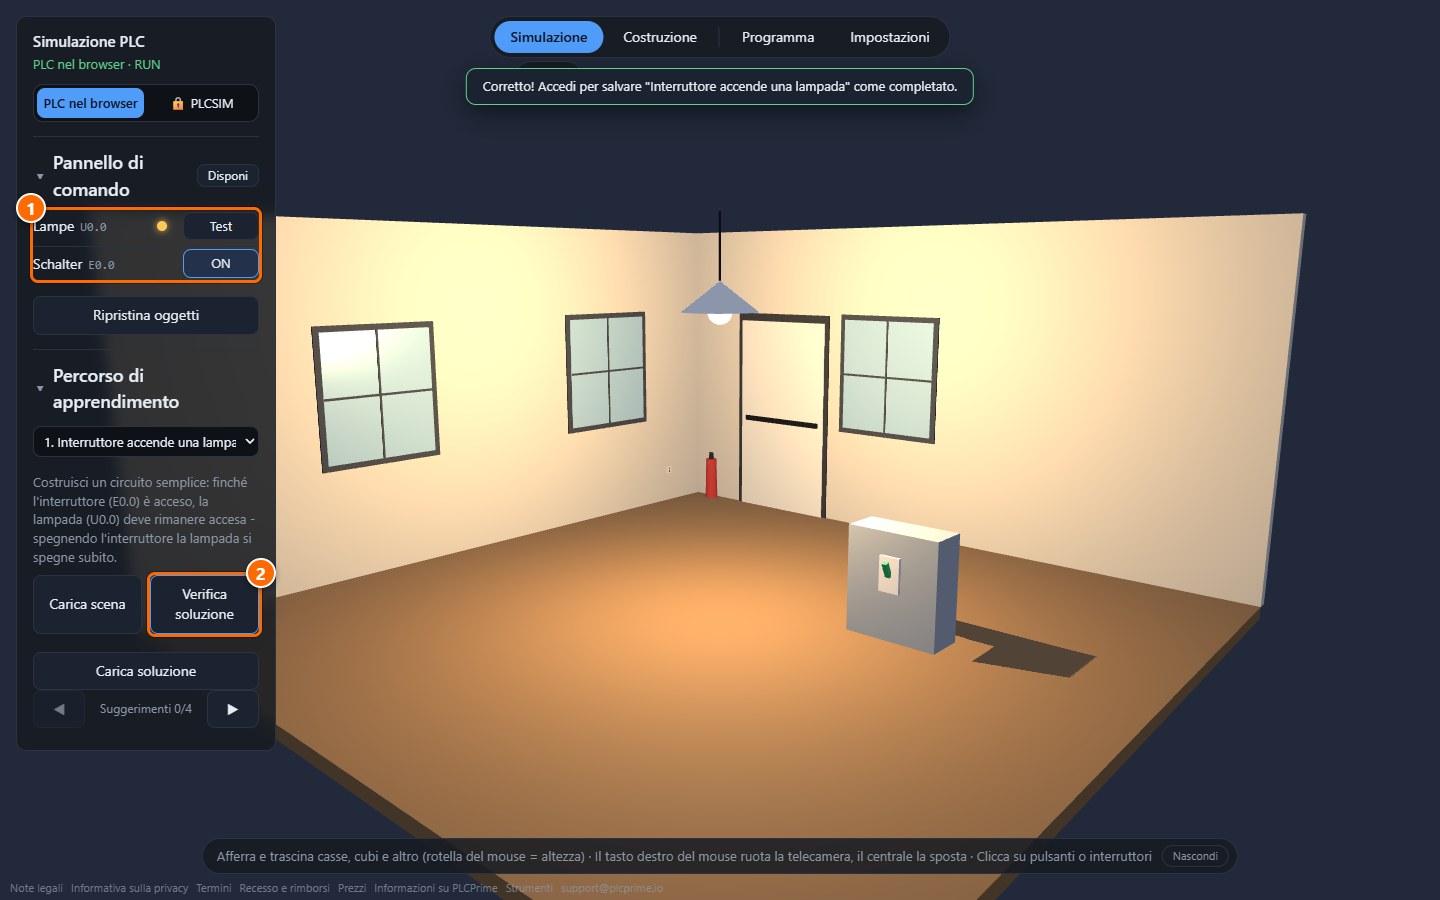
- Interruttore acceso, lampada accesa.
- Verifica soluzione segnala che l'esercizio è risolto. Se accedi con un account in Impostazioni (Basic è gratuito), PLCPrime ricorda il livello come completato.
Dice che non è ancora del tutto giusto? Controlla che il filo sia davvero collegato e che entrambi gli indirizzi siano corretti. I suggerimenti rivelano di più passo dopo passo e Carica soluzione mostra il programma finito.
7. Costruire i propri impianti
Passa a Costruzione nella barra delle modalità. A destra compare il catalogo Aggiungi elementi con lampade, pulsanti, interruttori, sensori, nastri trasportatori e molto altro.
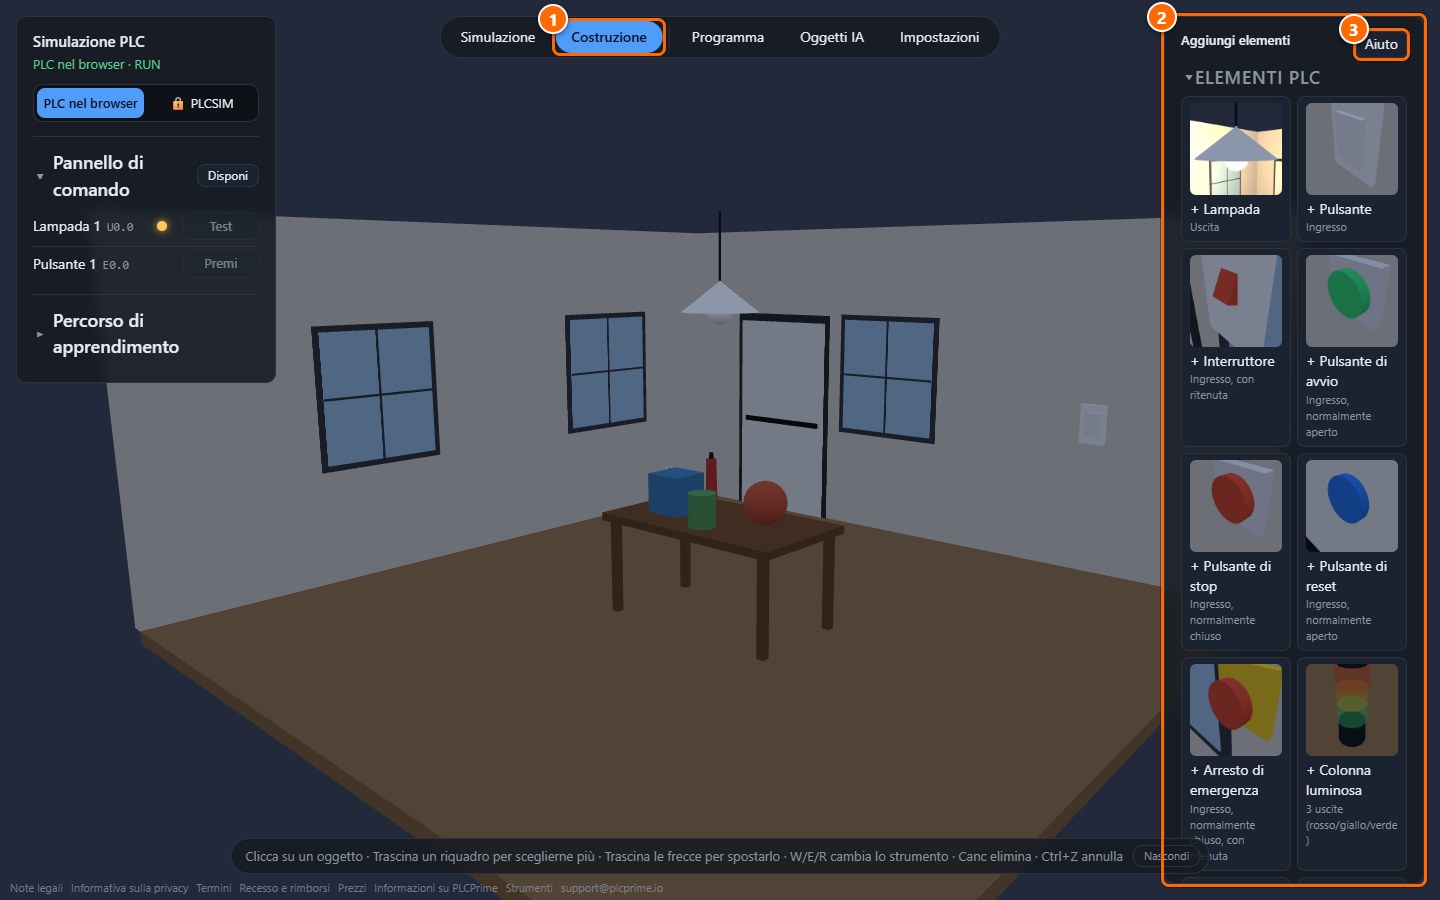
- La modalità Costruzione.
- Il catalogo: un clic su una scheda aggiunge l'oggetto alla scena.
- Il pulsante Aiuto spiega ogni oggetto.
Clicca un oggetto, spostalo con le frecce e cambia strumento con W, E e R. Canc elimina, Ctrl+Z annulla. Indirizzo, nome e colore degli oggetti si cambiano nell'area di selezione: il programma si rivolge all'oggetto tramite il suo indirizzo.
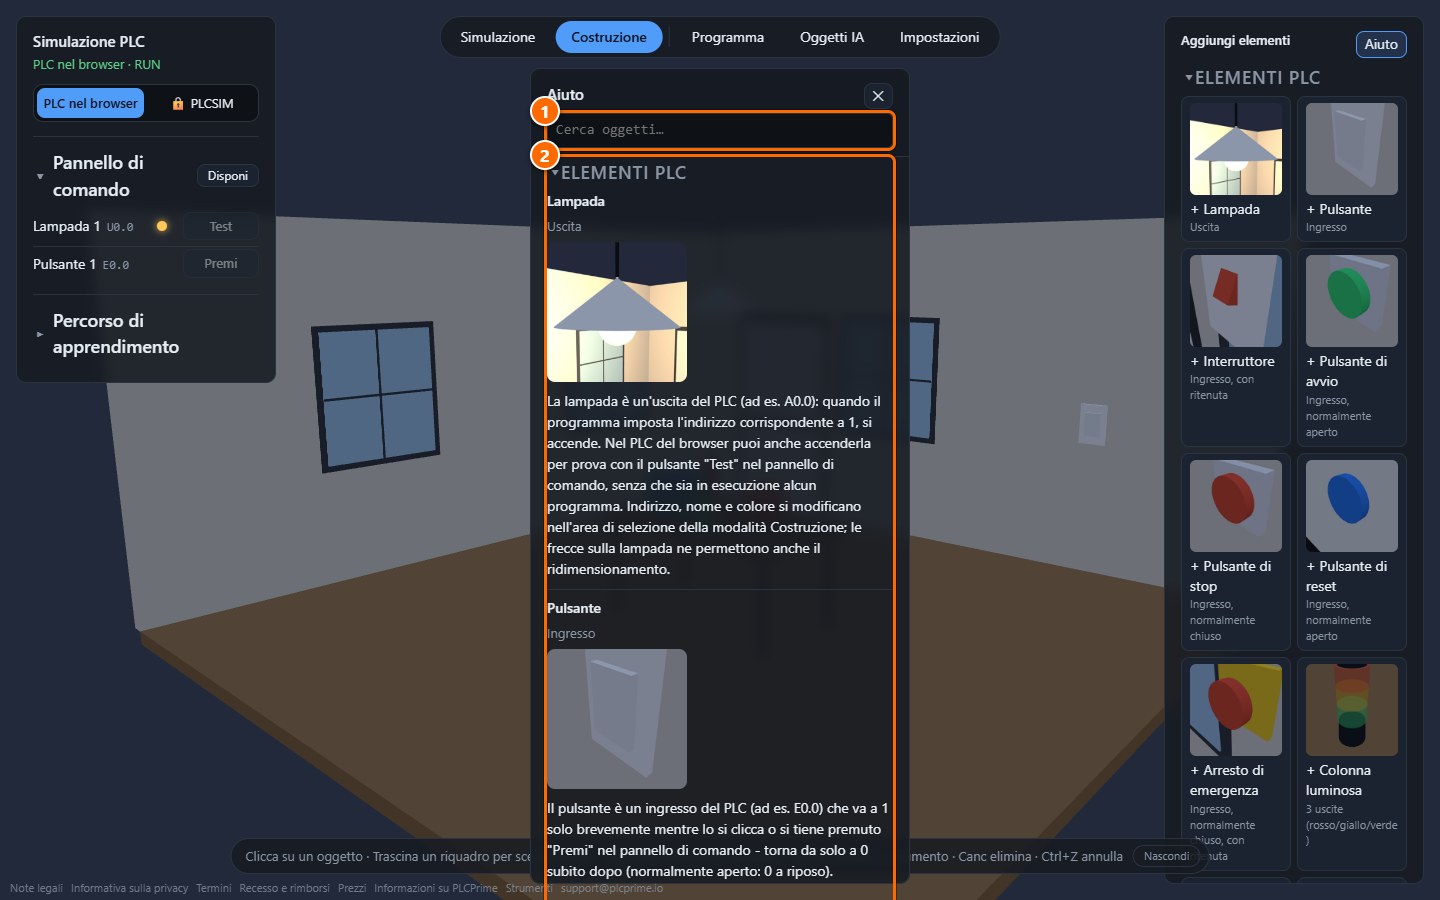
- Campo di ricerca: cerca gli oggetti.
- Le spiegazioni: a cosa serve l'oggetto, quali ingressi e uscite ha e cosa si può impostare.
E poi?
- Livelli da 2 a 5 (gratuiti): pulsante come relè a impulsi, nastro con avvio e arresto, fermare la cassa a fine nastro, contare le casse. Con Pro seguono fino al livello 16 riempire bottiglie, stampare bretzel, robot, pallet e il magazzino automatico.
- Video sul nostro canale YouTube.
- Progetti propri del Siemens TIA Portal si provano con il piano Premium e Siemens PLCSIM Advanced, vedi Su PLCPrime.
- Salvataggio, più oggetti, stanze più grandi e tutti i 16 livelli sono inclusi in Pro e Premium: Prezzi.
- Domande? Scrivi a support@plcprime.io.
Siemens, TIA Portal e PLCSIM Advanced sono marchi di Siemens AG. PLCPrime è un prodotto indipendente e non è affiliato a Siemens.